Uporabniški priročnik
User manual
Kako izpeljete vajo z avatarjem, posnamete sejo in jo nato označite ter iz nje sestavite lekcijo. Sledite korakom po vrsti.
How to run a session with the avatar, record it, then annotate it and turn it into a lesson. Follow the steps in order.
1Pregled in povezaveOverview and links
METKA sta dve ločeni spletni strani. Vsaka ima svojo nalogo.
METKA is two separate websites. Each has its own job.
| Stran | Site | Za kaj jo uporabljate | What you use it for | Prijava | Login |
|---|---|---|---|---|---|
| app.metka.ai | Živa vaja z avatarjem. Inštruktor govori skozi avatarja, študent se z njim pogovarja. Tu nastane posnetek seje. | The live session with the avatar. The instructor speaks through the avatar, the student talks to it. This is where the recording is made. | Ni potrebna — samo geslo seje, ki si ga izmislite sami. | None — just a session password you make up yourself. | |
| platform.metka.ai | Knjižnica. Tu shranite posnetke, jih označite in iz njih sestavite lekcije. | The library. Store recordings here, annotate them and build lessons from them. | Potrebujete uporabniško ime in geslo. | You need a username and password. |
Vrstni red dela
The order of work
Za dostop do platform.metka.ai pišite na vid.klopcic@fri.uni-lj.si. Uporabniškega računa si ne morete ustvariti sami.
To get access to platform.metka.ai write to vid.klopcic@fri.uni-lj.si. You cannot create an account yourself.
2app.metka.ai — vaja in snemanjeapp.metka.ai — session and recording
Uporabite Chrome. Vsi udeleženci vpišejo isto geslo seje — tako se znajdejo v isti seji.
Use Chrome. All participants enter the same session password — that is what puts them in the same session.
-
Odprite app.metka.ai in izberite svojo vlogo
Open app.metka.ai and pick your role
- INSTRUCTOR — vodite avatarja (vaš glas in obraz gresta v avatarja).
- INSTRUCTOR — you drive the avatar (your voice and face go into the avatar).
- STUDENT — pogovarjate se z avatarjem.
- STUDENT — you talk to the avatar.
- SUPERVISOR — samo opazujete, ne sodelujete.
- SUPERVISOR — you only watch, you do not take part.
-
Vpišite geslo seje in svoje ime
Enter the session password and your name
Geslo seje si izmislite sami (npr. vaja1). Vsi, ki vpišejo isto geslo, so v isti seji.
You make up the session password yourself (e.g. vaja1). Everyone who enters the same password lands in the same session.
Inštruktor ima še polje Session context — na kratko opišite scenarij. To vidijo ostali udeleženci pod ikono i.
The instructor also gets a Session context field — briefly describe the scenario. Other participants can read it under the i icon.
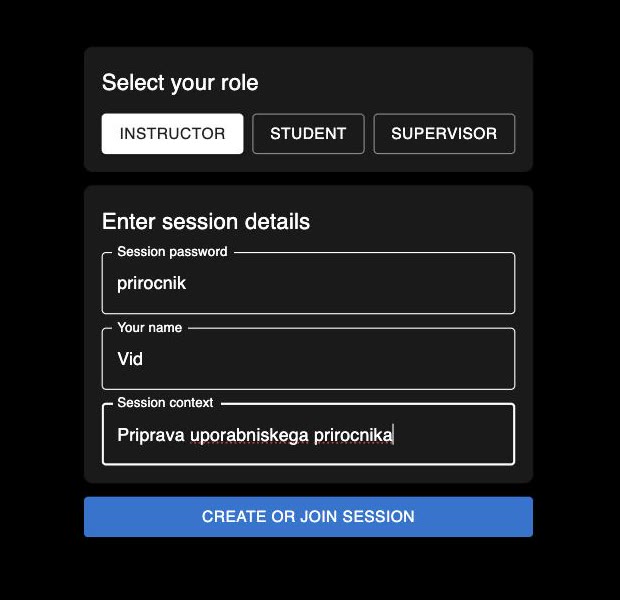
Vloga INSTRUCTOR je izbrana, polja so izpolnjena. Kliknite CREATE OR JOIN SESSION. Role INSTRUCTOR selected, fields filled in. Click CREATE OR JOIN SESSION. Zapomnite si geslo seje. Potrebovali ga boste, da se pozneje vrnete po posnetek.
Remember the session password. You will need it to come back for the recording later.
-
Počakajte na tri kljukice, nato kliknite JOIN
Wait for the three ticks, then click JOIN
Brskalnik vas vpraša za dovoljenje za mikrofon in kamero — kliknite Dovoli.
The browser asks for microphone and camera permission — click Allow.
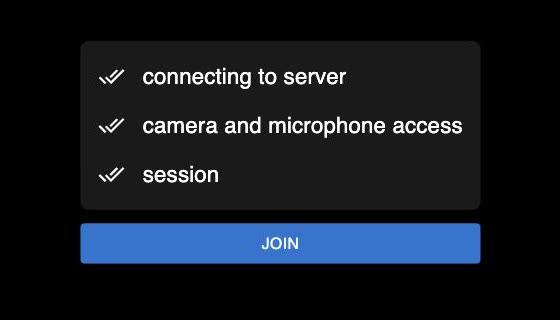
Ko so vse tri vrstice odkljukane, je vse pripravljeno. When all three lines are ticked, you are ready. -
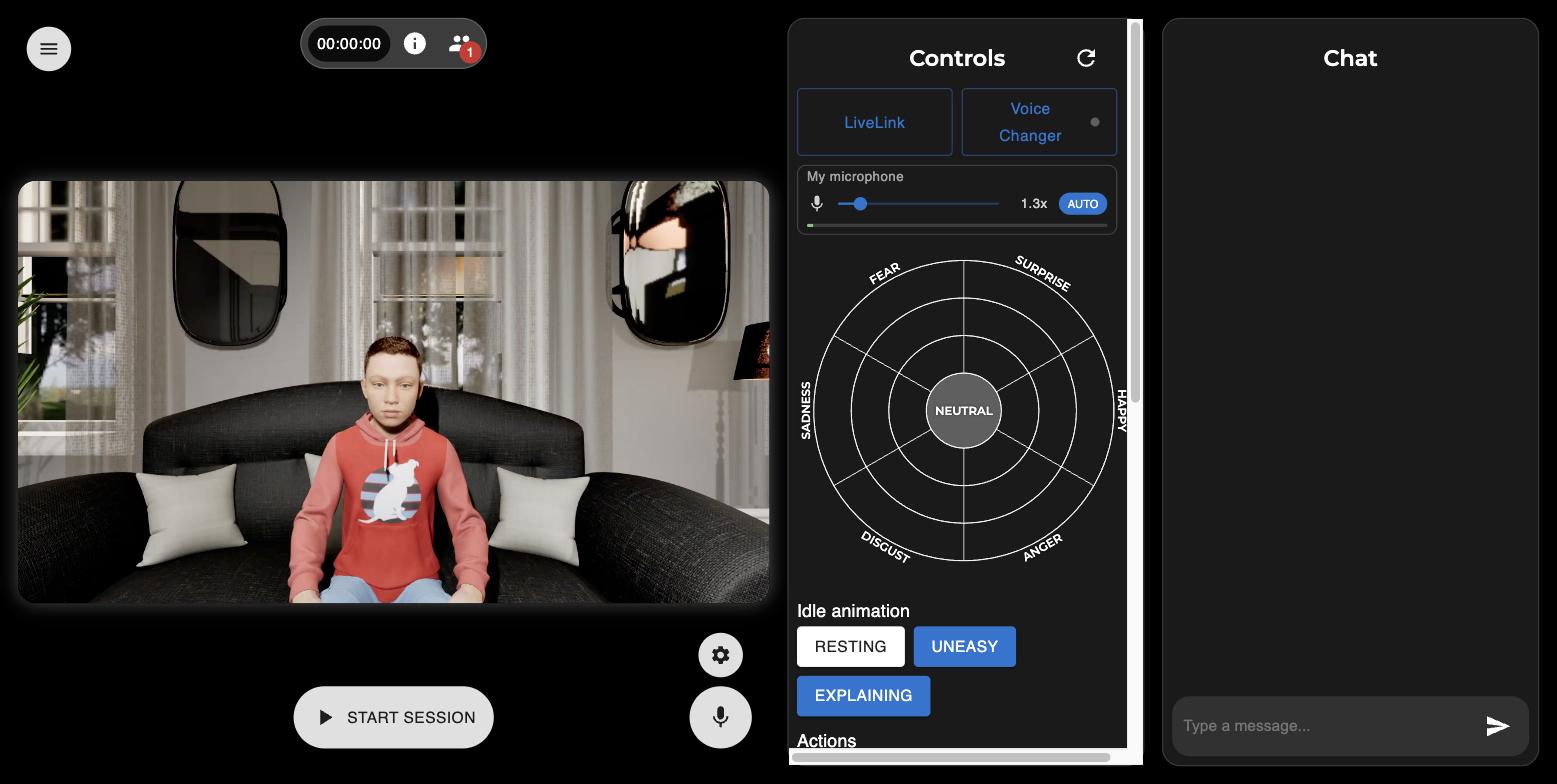
Spoznajte zaslon inštruktorja
Get to know the instructor screen
 123456789101112
- 1 Posnetki te seje (prenos in brisanje)
- 2 Trajanje seje
- 3 Opis scenarija
- 4 Udeleženci
- 5 Začni / končaj sejo
- 6 Izbira mikrofona in zvočnika
- 7 Utišanje mikrofona
- 8 Navodila za LiveLink (obraz z iPhona)
- 9 Spreminjevalnik glasu
- 10 Glasnost vašega mikrofona
- 11 Čustva avatarja — kliknite v kolo
- 12 Klepet z udeleženci
- 1 Recordings of this session (download and delete)
- 2 Session duration
- 3 Scenario description
- 4 Participants
- 5 Start / end the session
- 6 Pick microphone and speaker
- 7 Mute your microphone
- 8 LiveLink instructions (face from an iPhone)
- 9 Voice changer
- 10 Your microphone level
- 11 Avatar emotion — click inside the wheel
- 12 Chat with participants
Desni stolpec ima še Idle animation (drža avatarja), Actions (jok, zehanje …), Camera (bližina kadra), Environment (prostor) in Character (kateri otrok — črka, starost in spol, npr. F 9M = 9-letni deček). Podrsajte navzdol, da vidite vse.
The right column also has Idle animation (the avatar's posture), Actions (cry, yawn …), Camera (shot framing), Environment (the room) and Character (which child — letter, age and sex, e.g. F 9M = a 9-year-old boy). Scroll down to see them all.
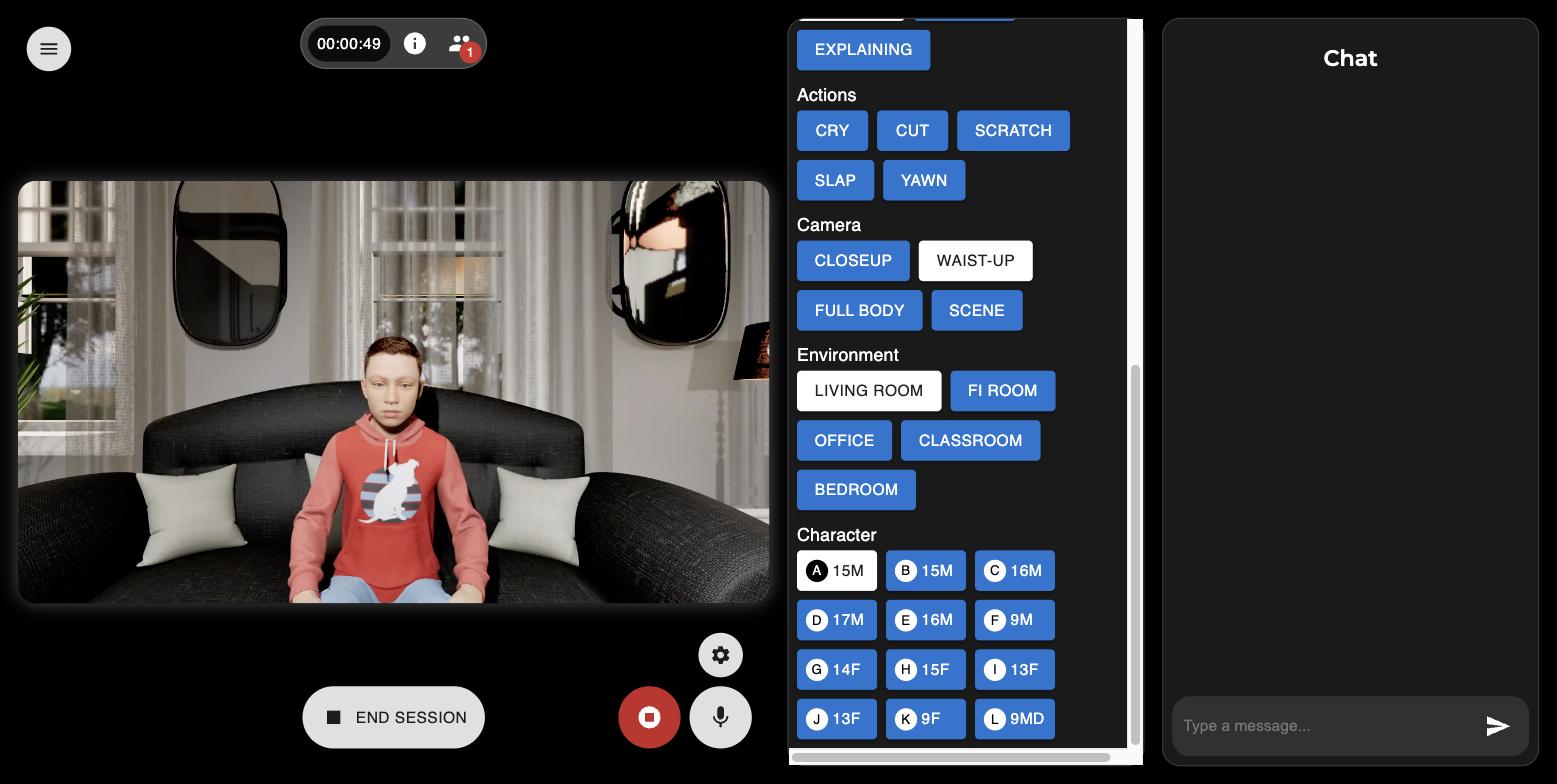
Spodnji del stolpca Controls. The lower part of the Controls column. -
Nastavite mikrofon in zvočnik
Set your microphone and speaker
Kliknite ikono zobnika (6). Zgoraj izberite mikrofon, spodaj zvočnik.
Click the gear icon (6). Pick a microphone at the top and a speaker at the bottom.
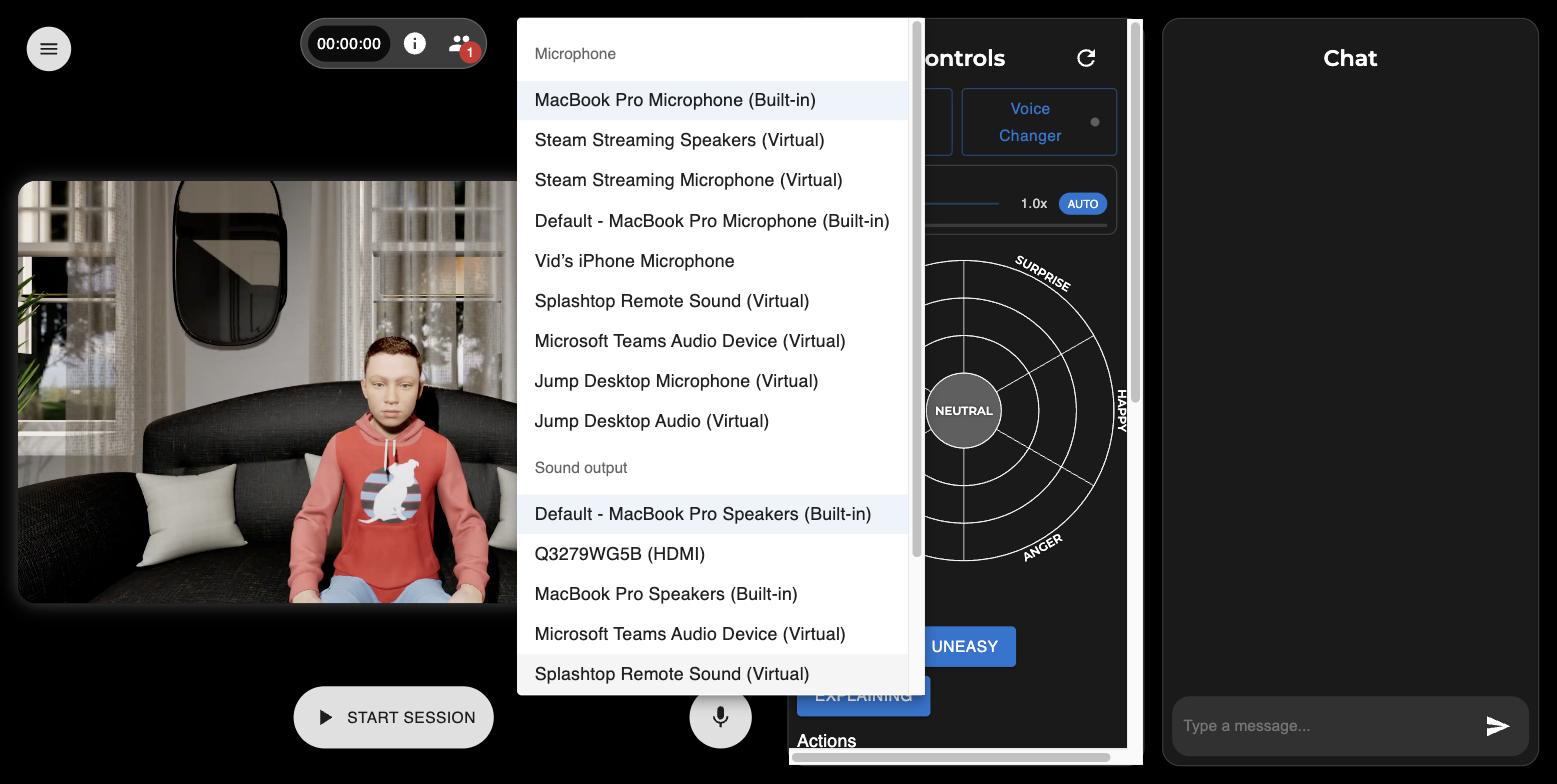
Izberite pravo napravo. Slušalke so vedno boljše od zvočnikov — preprečijo odmev. Pick the right device. Headphones always beat speakers — they prevent echo. Uporabljajte slušalke. Če sta inštruktor in študent v istem prostoru ali brez slušalk, nastane odmev in piskanje.
Wear headphones. If the instructor and student are in the same room, or without headphones, you get echo and howling.
Pod tem je drsnik My microphone. Pustite ga na AUTO — sistem sam prilagodi glasnost. Ročno ga premaknite le, če vas drugi slišijo pretiho ali preglasno.
Below that is the My microphone slider. Leave it on AUTO — the system adjusts the level for you. Move it by hand only if others hear you too quietly or too loudly.
-
Vklopite spreminjevalnik glasu (samo inštruktor)
Turn on the voice changer (instructor only)
Kliknite Voice Changer (9), nato Turn on voice changing. Izberite glas. Zelena pika pomeni, da je vklopljen.
Click Voice Changer (9), then Turn on voice changing. Pick a voice. A green dot means it is on.
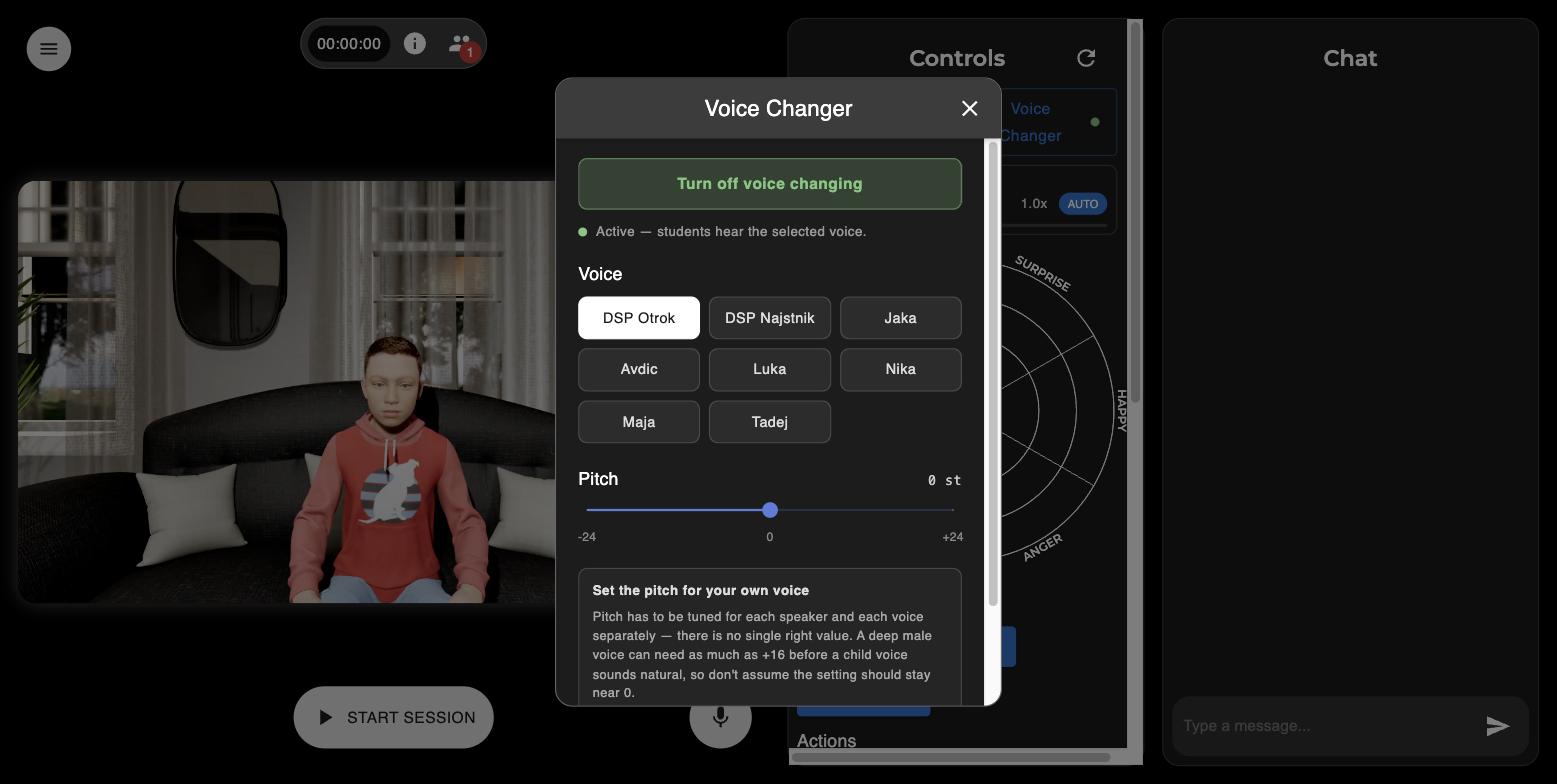
Vklopljeno: Active — students hear the selected voice. On: Active — students hear the selected voice. Najpomembnejša nastavitev: Pitch. Drsnik Pitch je treba nastaviti posebej za vsakega govorca in vsak glas. Ni ene pravilne vrednosti in 0 skoraj nikoli ni prava.
Globok moški glas potrebuje lahko tudi +16, preden otroški glas zveni naravno.
Kako nastavite: govorite in med tem premikajte drsnik po en korak naenkrat, dokler avatar ne zveni pravilno. Če zveni popačeno, robotsko ali nerazločno, je pitch napačen za to kombinacijo — nastavljajte naprej, ne obupajte nad glasom.
The most important setting: Pitch. The Pitch slider must be tuned separately for every speaker and every voice. There is no single right value, and 0 is almost never the right one.
A deep male voice can need as much as +16 before a child voice sounds natural.
How to set it: keep talking while you move the slider one step at a time until the avatar sounds right. If it comes out garbled, robotic or slurred, the pitch is wrong for that combination — keep adjusting rather than giving up on the voice.
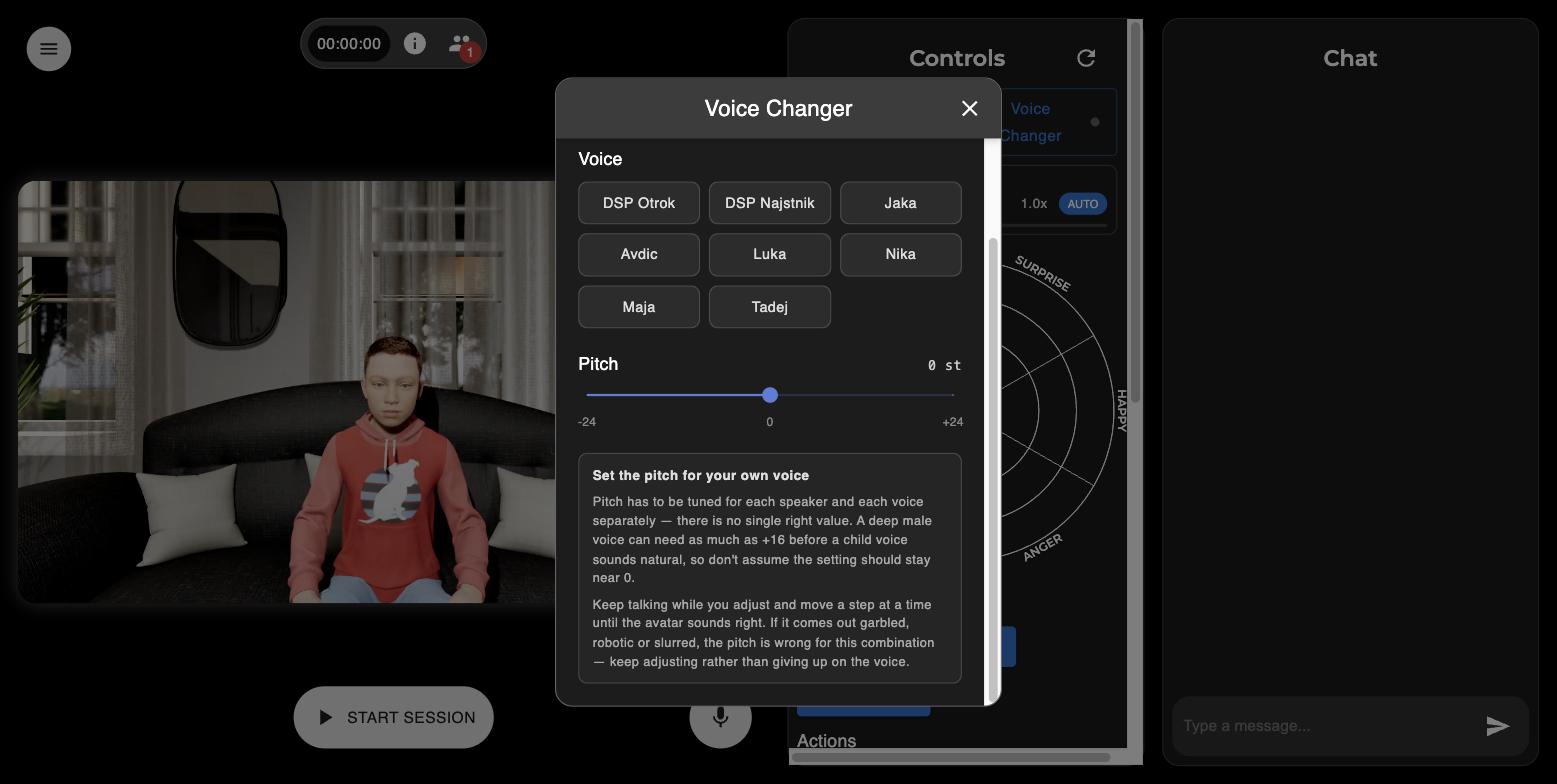
Drsnik Pitch in opozorilo, ki je zapisano tudi v aplikaciji. The Pitch slider and the warning that is also written in the app. Glasovi so na seznamu razvrščeni po kakovosti: najprej AI glasovi (Maja, Nika, Tadej, Luka; prvi je privzeta izbira), nato Zamik višine (samo zamik višine vašega glasu, brez AI) in na koncu DSP Otrok (slabše) in DSP Najstnik (slabše), ki sta na voljo le kot rezerva.
The list is ordered by quality: the AI voices first (Maja, Nika, Tadej, Luka; the first one is the default), then Zamik višine (a plain pitch shift of your own voice, no AI) and last DSP Otrok (slabše) and DSP Najstnik (slabše), kept only as a fallback.
Po zamenjavi glasu se za dve do tri sekunde poveča zakasnitev — to je normalno, sistem naloži nov model.
After switching voices there is two to three seconds of extra delay — that is normal, the system is loading the new model.
-
Povežite obraz z iPhona (LiveLink, samo inštruktor)
Connect your face from an iPhone (LiveLink, instructor only)
Če želite, da avatar posnema vašo mimiko, kliknite LiveLink (8) in sledite navodilom, ki se izpišejo v aplikaciji. Tam sta izpisana pravi naslov strežnika in vrata za vaš primer.
If you want the avatar to mirror your facial expressions, click LiveLink (8) and follow the instructions shown in the app. They list the correct server address and port for your case.
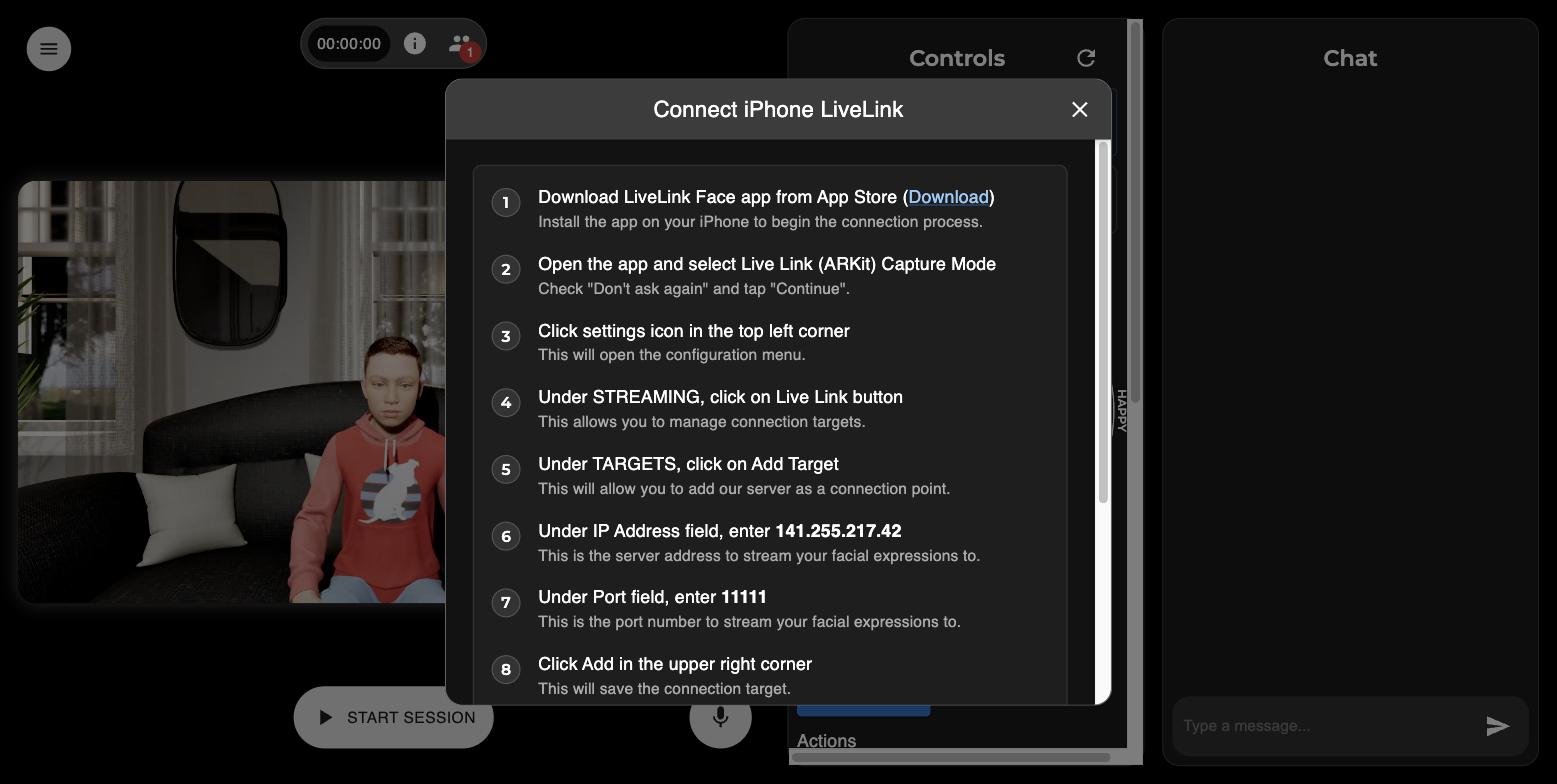
Navodila po korakih so v aplikaciji. Podrsajte navzdol za preostale korake. The step-by-step instructions live in the app. Scroll down for the remaining steps. iPhone mora biti na istem omrežju kot računalnik. Brez LiveLinka seja deluje normalno — avatar samo ne posnema vašega obraza.
The iPhone must be on the same network as the computer. Without LiveLink the session works fine — the avatar just will not mirror your face.
-
Začnite sejo
Start the session
Kliknite START SESSION. Števec začne teči, gumb se spremeni v END SESSION, poleg njega pa se pojavi okrogel gumb za snemanje.
Click START SESSION. The timer starts, the button becomes END SESSION, and a round record button appears next to it.
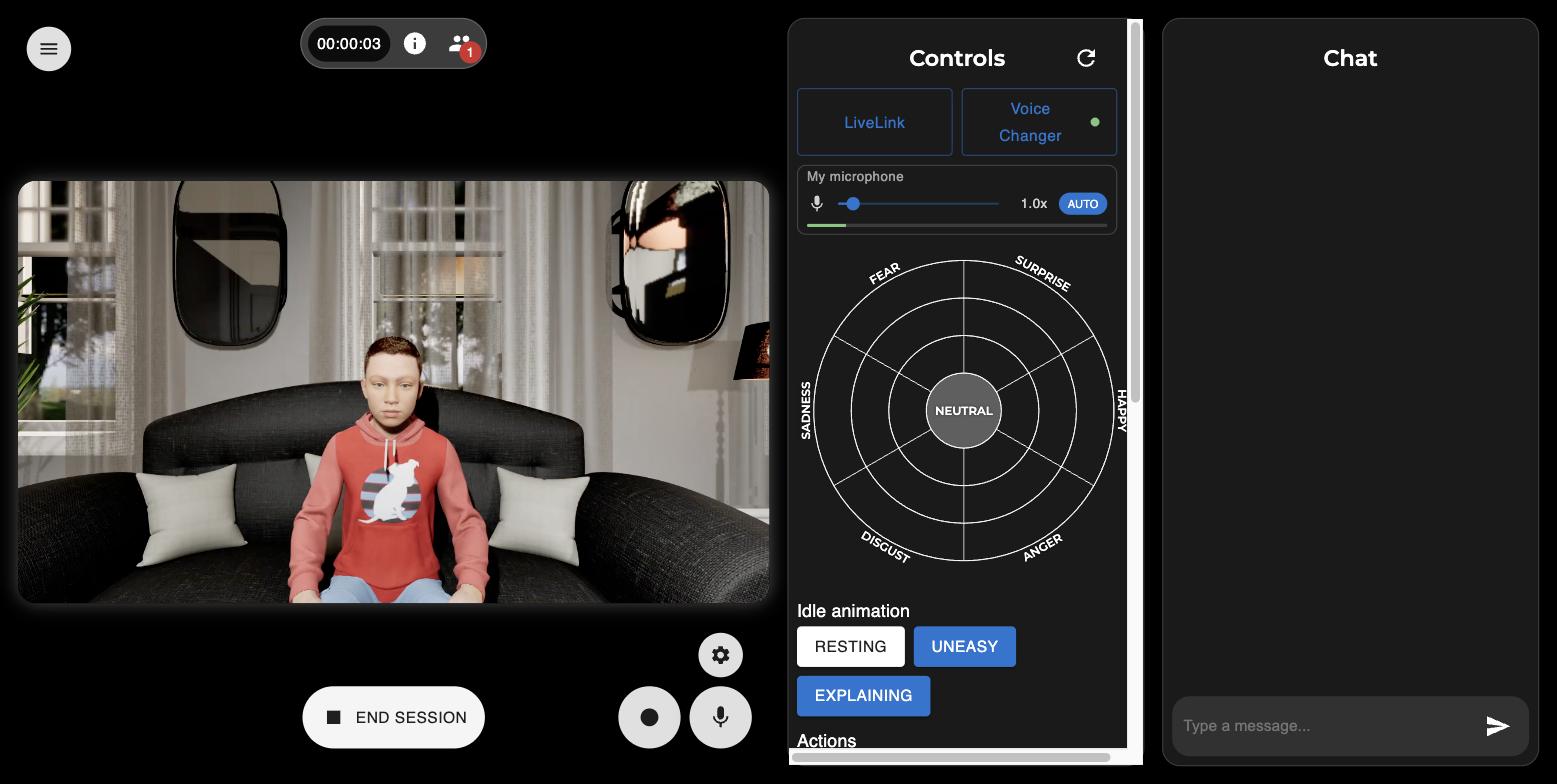
Seja teče. Okrogli gumb na sredini je za snemanje. The session is running. The round button in the middle is for recording. -
Vklopite snemanje
Start recording
Če želite video seje, kliknite okrogli gumb za snemanje. Postane rdeč s kvadratkom — to pomeni, da snemanje teče.
If you want a video of the session, click the round record button. It turns red with a square — that means recording is running.
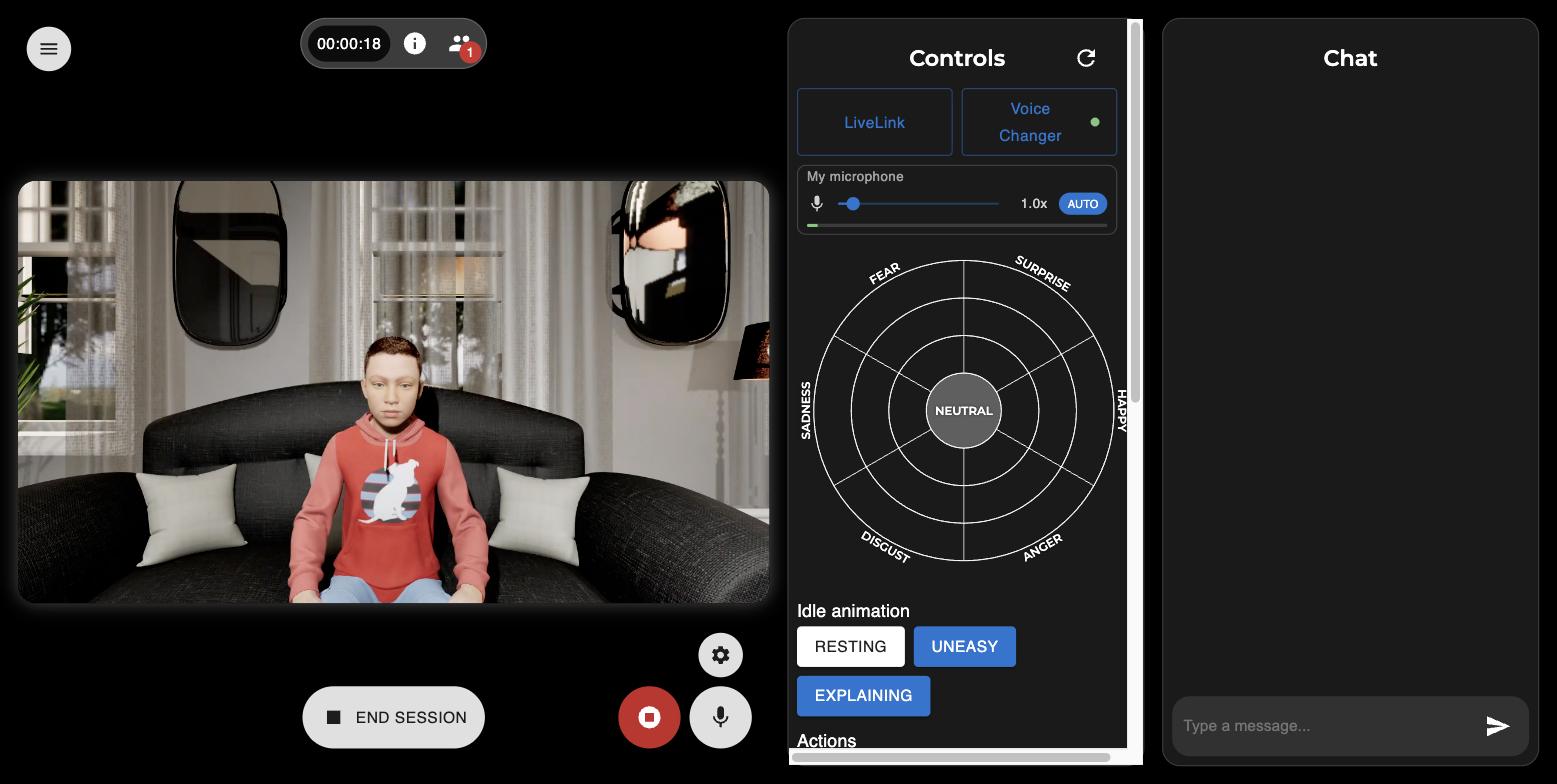
Rdeč gumb = snemanje teče. Red button = recording is running. Snemanje se ne vklopi samo od sebe. Če pozabite klikniti, posnetka ne bo.
Recording does not start by itself. If you forget to click, there will be no recording.
-
Končajte snemanje in sejo
Stop the recording and the session
Ko ste končali, najprej ustavite snemanje (znova kliknite rdeči gumb), nato kliknite END SESSION.
When you are done, stop the recording first (click the red button again), then click END SESSION.
-
Počakajte, da se posnetek obdela
Wait for the recording to be processed
Odprite meni zgoraj levo (1). Med obdelavo piše Processing….
Open the menu at the top left (1). While it is being processed it says Processing….
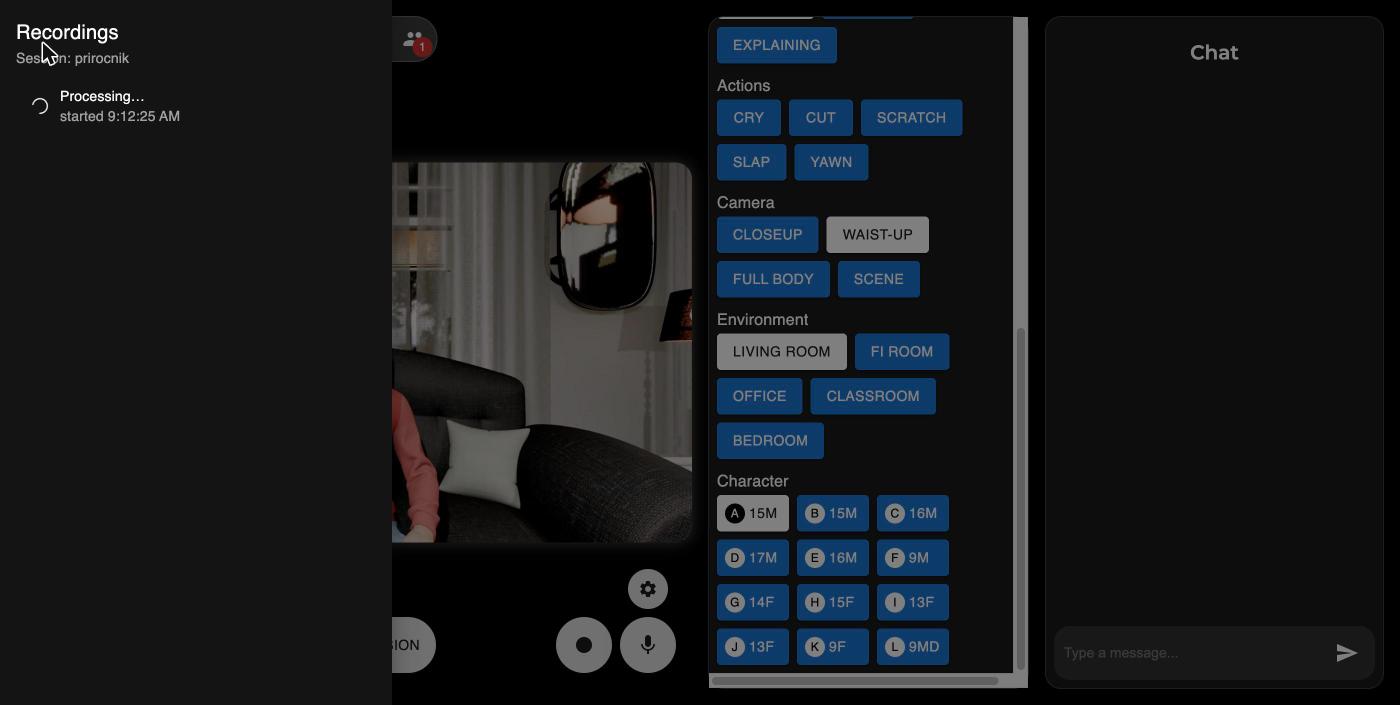
Obdelava lahko traja nekaj časa — pri daljših sejah tudi več minut. Processing can take a while — several minutes for longer sessions. Ni vam treba čakati pred zaslonom. Brskalnik lahko zaprete. Pozneje se vrnite na app.metka.ai in vstopite z istim geslom seje — posnetek vas bo čakal.
You do not have to sit and wait. You can close the browser. Come back to app.metka.ai later and join with the same session password — the recording will be waiting for you.
-
Prenesite posnetek in ga nato izbrišite
Download the recording, then delete it
Ko je posnetek gotov, se pokažeta ime datoteke in velikost. Kliknite ikono za prenos (puščica navzdol).
When the recording is ready, the file name and size appear. Click the download icon (the down arrow).
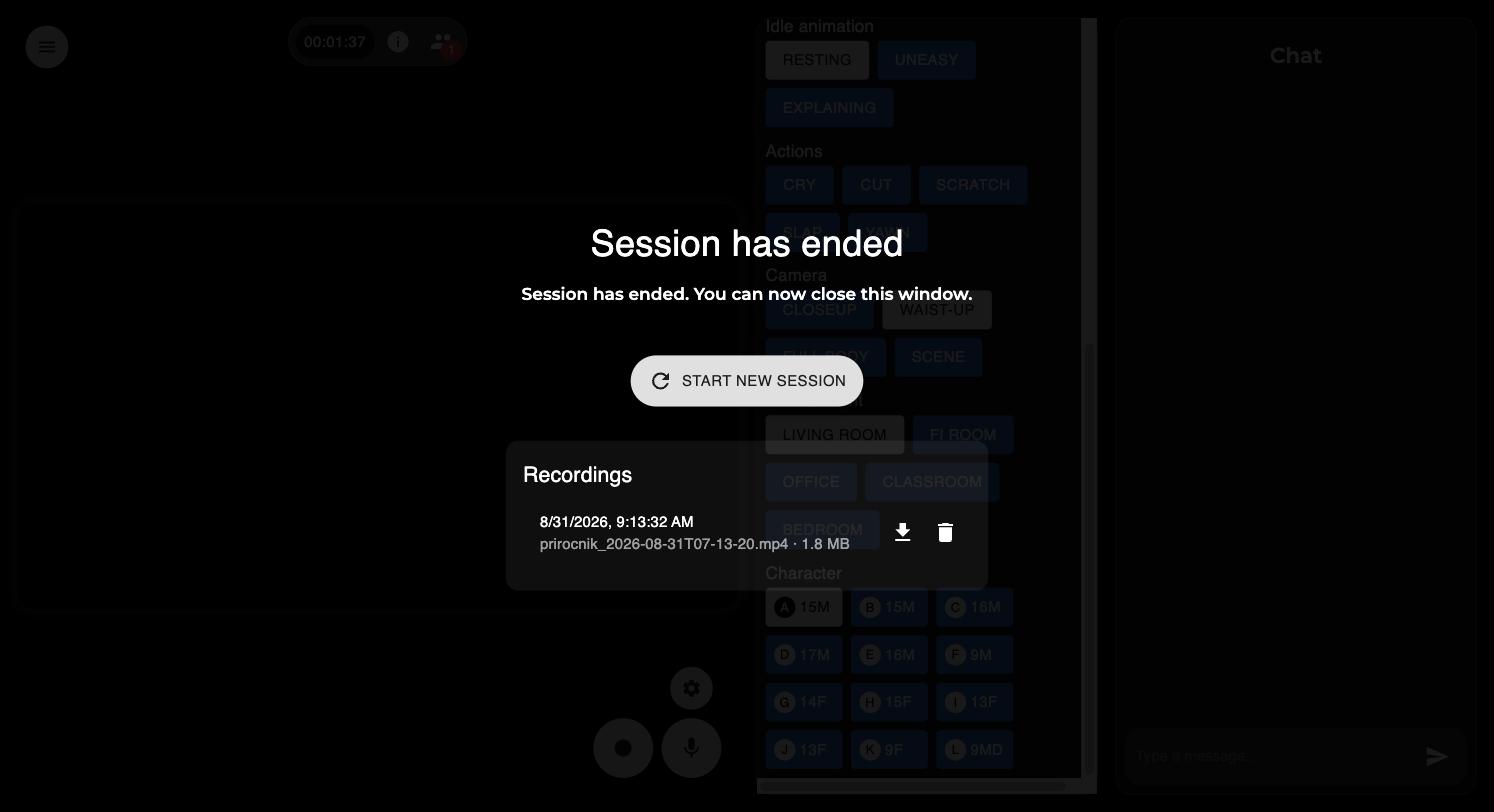
Puščica navzdol = prenos. Koš = izbris. Down arrow = download. Bin = delete. Ko ste posnetek prenesli in preverili, da se predvaja, ga izbrišite s klikom na ikono koša. Tako na strežniku ostane prostor za naslednje seje.
Once you have downloaded the recording and checked that it plays, delete it with the bin icon. That keeps space free on the server for the next sessions.
Posnetek je zdaj na vašem računalniku. Nadaljujte na platform.metka.ai.
The recording is now on your computer. Continue on platform.metka.ai.
3platform.metka.ai — nalaganje posnetkaplatform.metka.ai — uploading a recording
-
Prijavite se
Log in
Odprite platform.metka.ai in vpišite uporabniško ime in geslo. Če ju še nimate, pišite na vid.klopcic@fri.uni-lj.si.
Open platform.metka.ai and enter your username and password. If you do not have them yet, write to vid.klopcic@fri.uni-lj.si.
Po prijavi vidite domačo stran s tremi razdelki: My sessions (vaše seje), Organization sessions (seje vaše organizacije) in Lessons (lekcije).
After logging in you see the home page with three sections: My sessions, Organization sessions and Lessons.
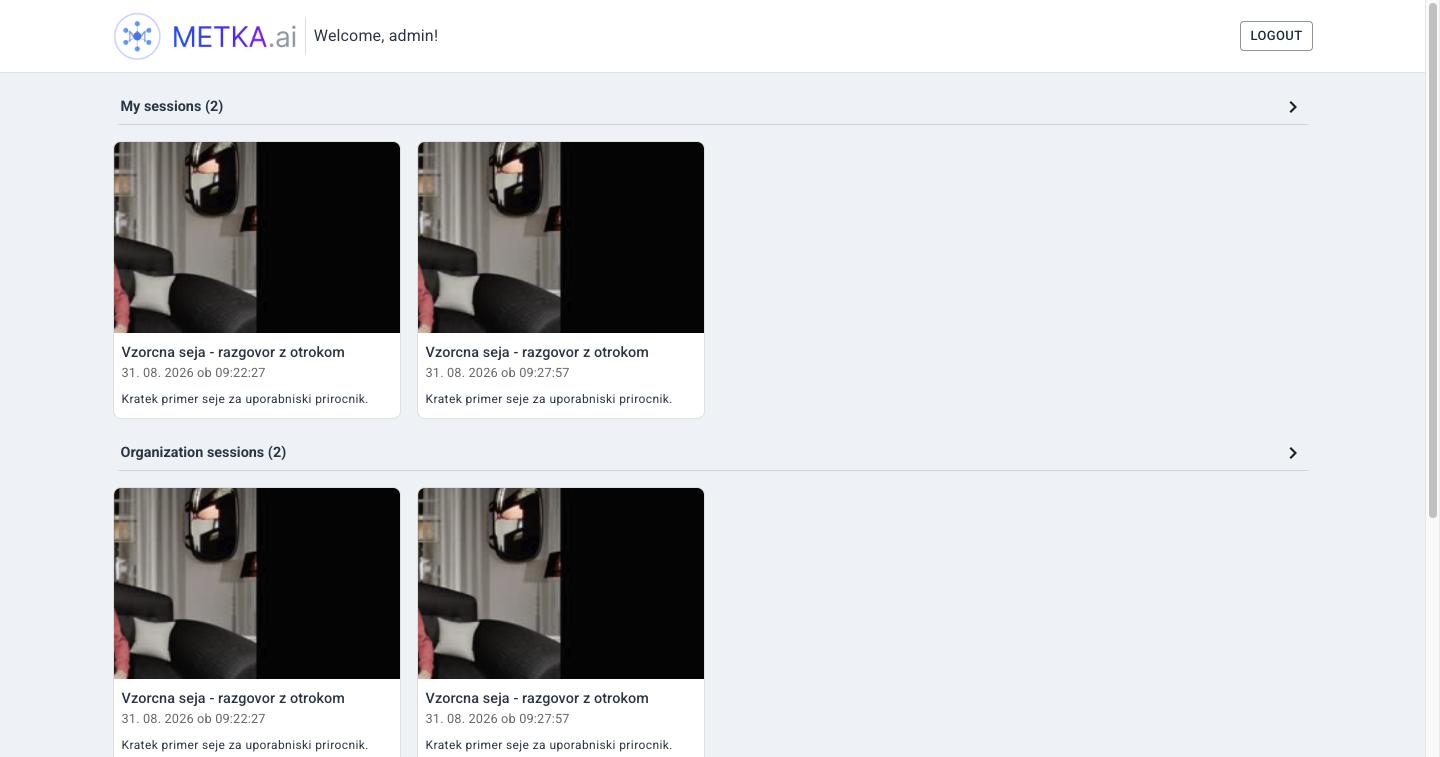
Domača stran. Klik na naslov razdelka odpre celoten seznam. The home page. Clicking a section title opens the full list. -
Pojdite v My sessions in kliknite UPLOAD SESSION
Go to My sessions and click UPLOAD SESSION
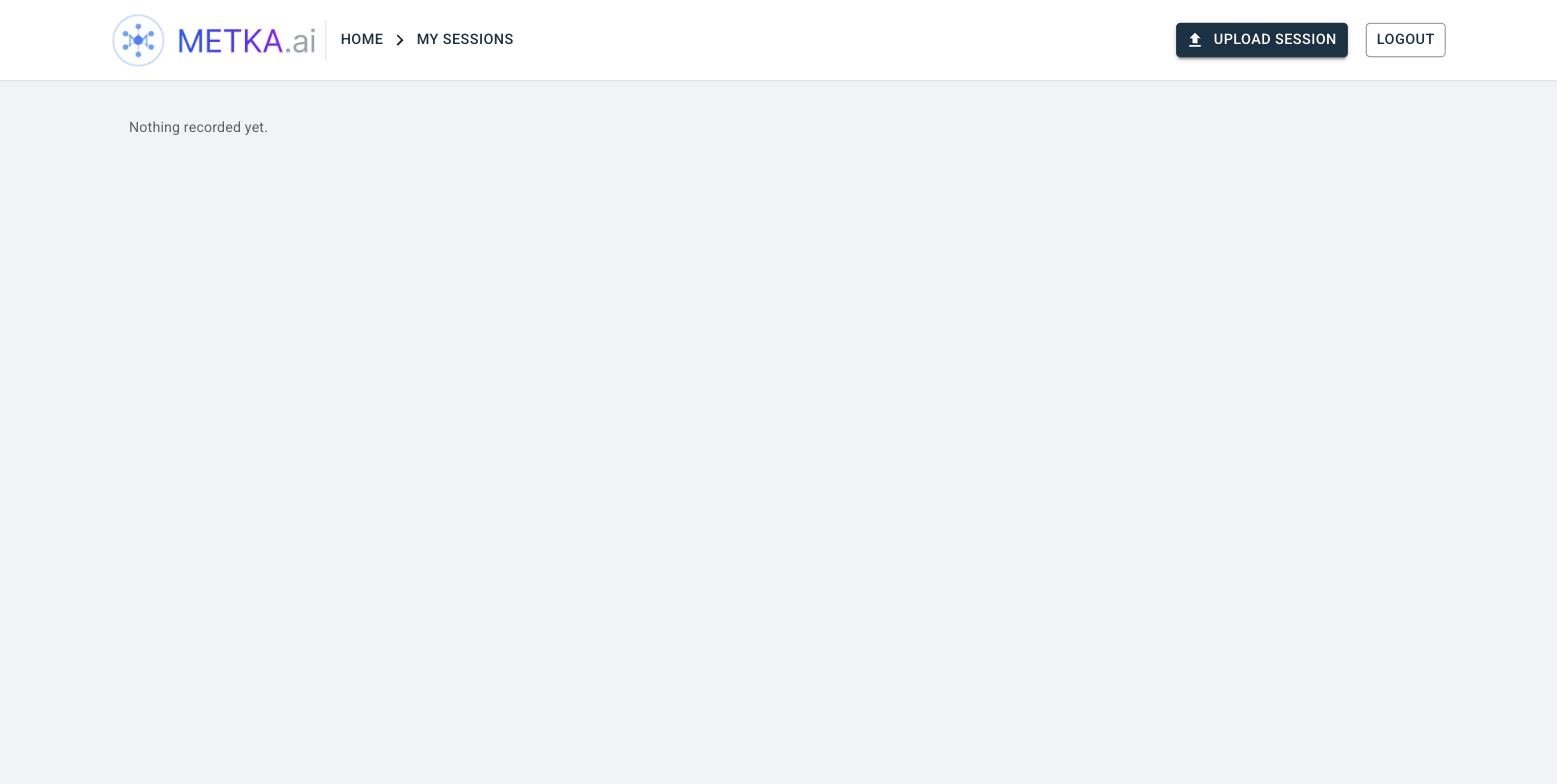
Gumb UPLOAD SESSION je zgoraj desno. The UPLOAD SESSION button is at the top right. -
Izberite video datoteko
Pick the video file
Datoteko povlecite v okvir ali kliknite nanj in jo poiščite. Podprti formati: MP4, MOV, AVI, MKV, WebM.
Drag the file into the box or click it and browse. Supported formats: MP4, MOV, AVI, MKV, WebM.
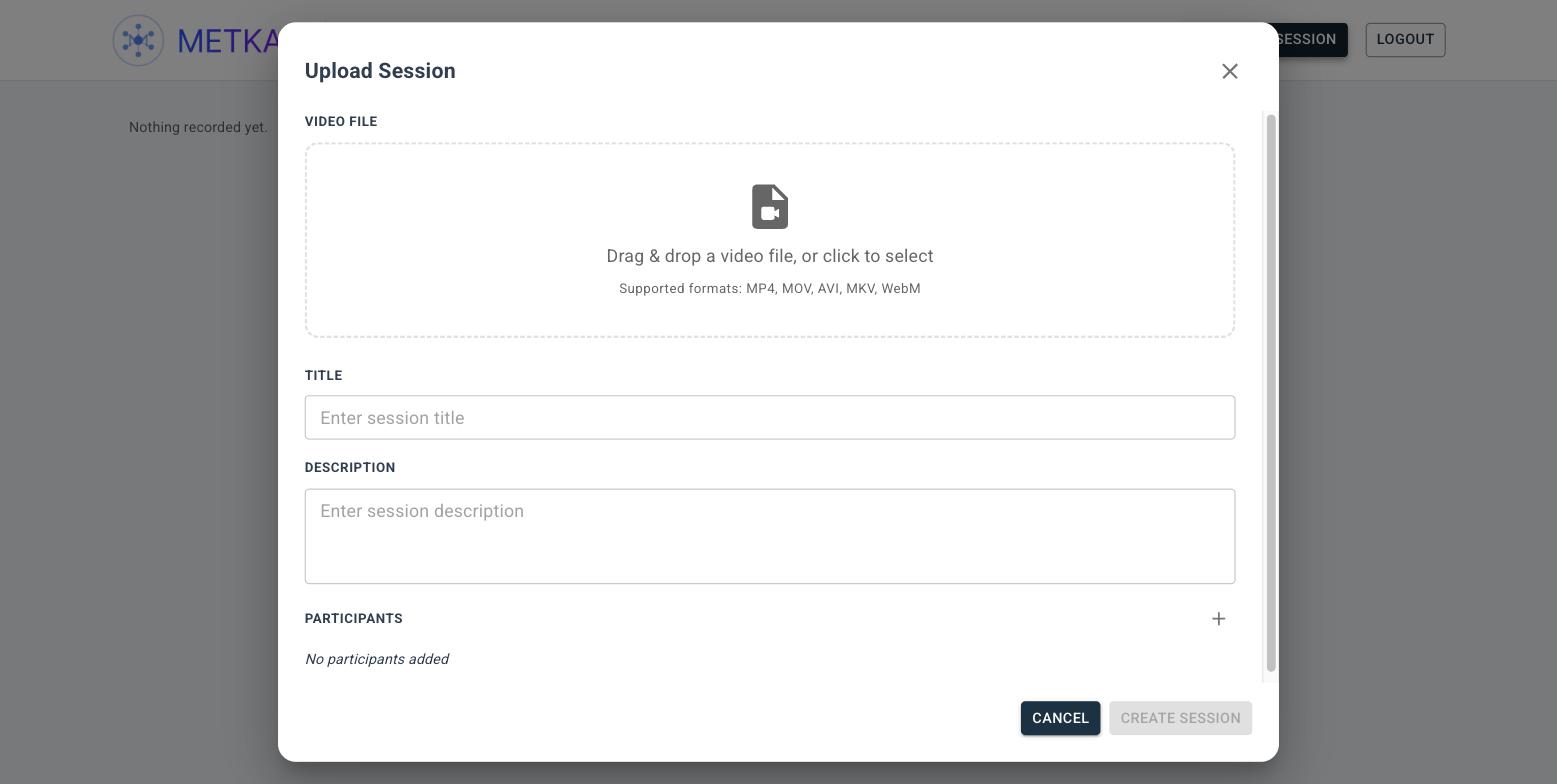
Okno Upload Session. The Upload Session dialog. Nalaganje se začne takoj. Počakajte, da se izpiše Upload complete.
The upload starts immediately. Wait until it says Upload complete.
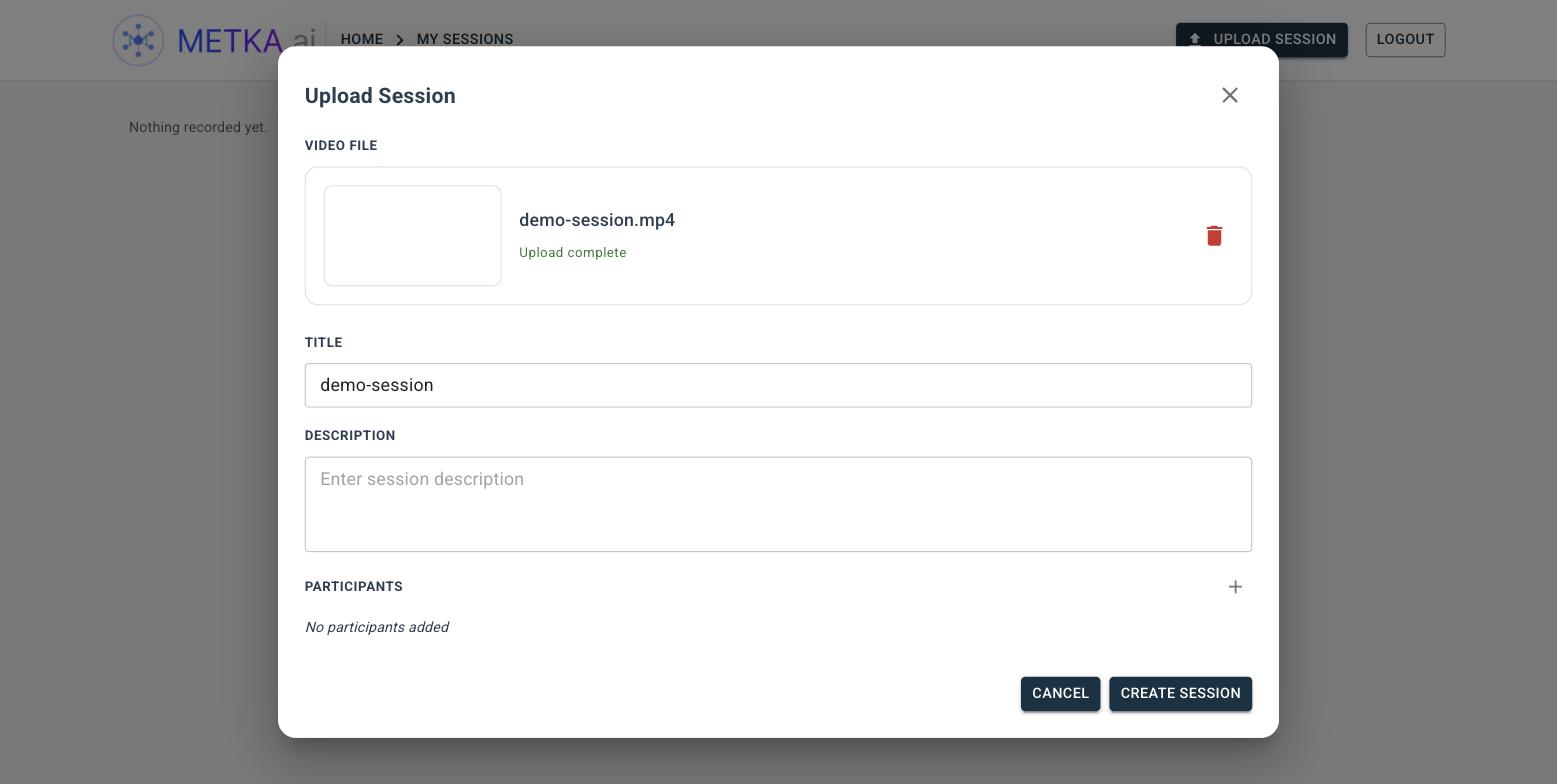
Naslov se samodejno izpolni z imenom datoteke — spremenite ga v nekaj razumljivega. The title is auto-filled from the file name — change it to something meaningful. -
Izpolnite podatke o seji
Fill in the session details
- TITLE — obvezno. Npr. „Razgovor z otrokom — vaja 1“.
- TITLE — required. E.g. "Interview with a child — exercise 1".
- DESCRIPTION — neobvezno. Kaj se v seji dogaja.
- DESCRIPTION — optional. What happens in the session.
- PARTICIPANTS — s + dodate vrstico, vpišete ime in izberete vlogo.
- PARTICIPANTS — click + to add a row, type a name and pick a role.
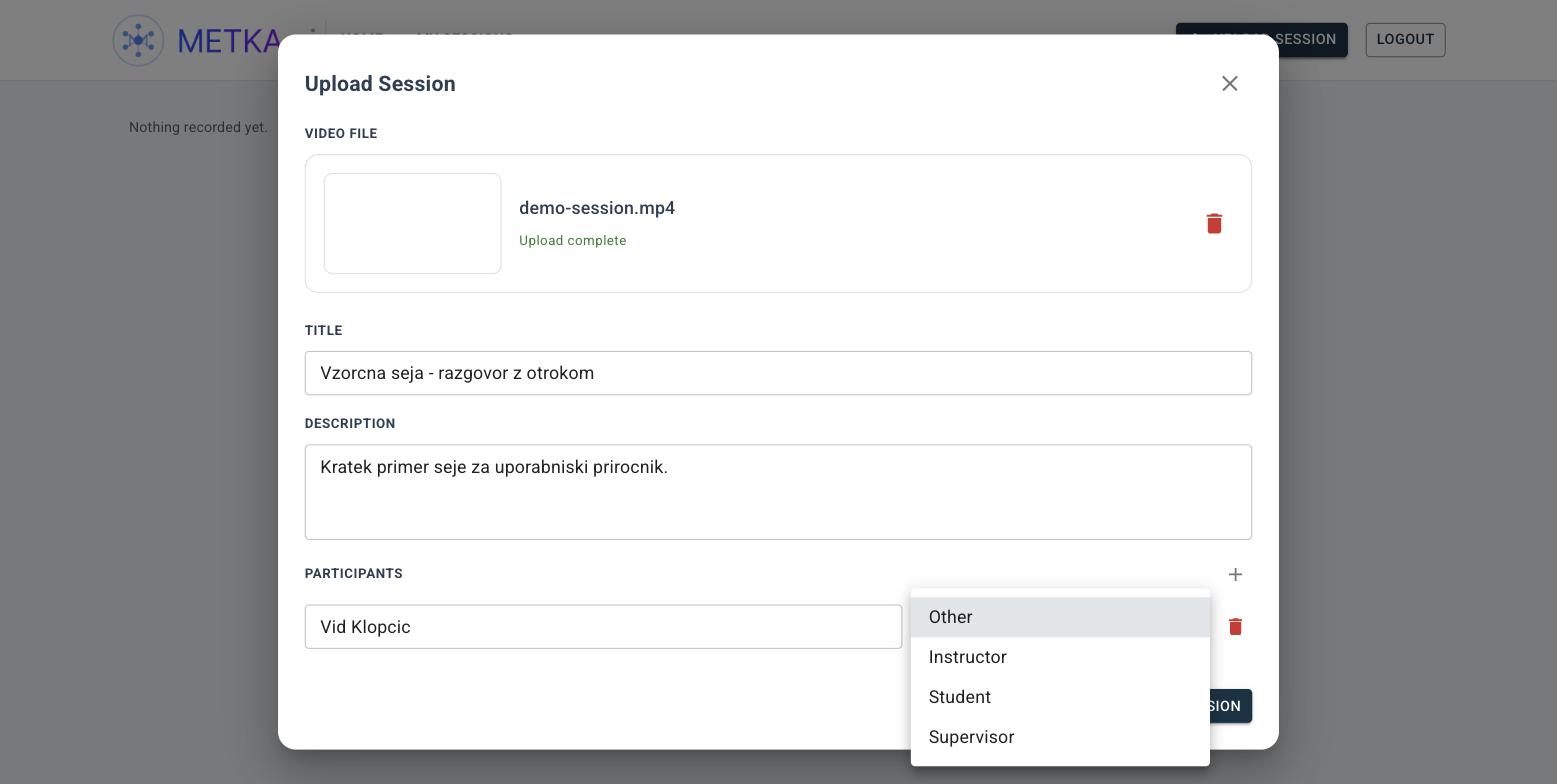
Vloge: Other, Instructor, Student, Supervisor. Roles: Other, Instructor, Student, Supervisor. Nato kliknite CREATE SESSION. Odpre se stran seje.
Then click CREATE SESSION. The session page opens.
-
Podatke lahko pozneje popravite
You can fix the details later
Na strani seje kliknite SESSION INFO, nato svinčnik. Tam popravite naslov, opis in udeležence.
On the session page click SESSION INFO, then the pencil. There you can fix the title, description and participants.
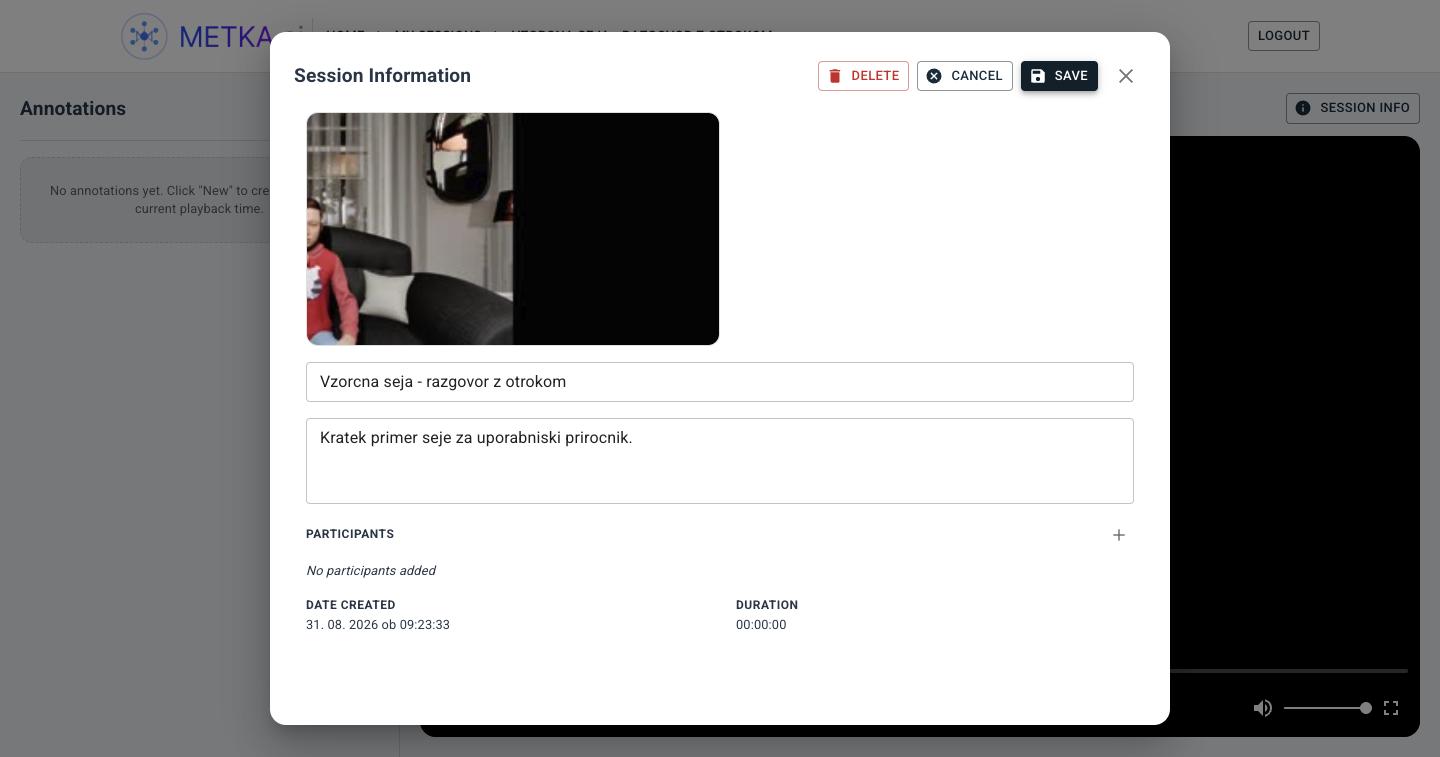
DELETE izbriše celotno sejo. Vidi ga samo lastnik seje. DELETE removes the whole session. Only the owner of the session sees it.
4Anotacije (označevanje posnetka)Annotations (marking up a recording)
Anotacija je oznaka na časovnici posnetka: „tu se je zgodilo nekaj, kar je vredno pokazati“. Iz anotacij pozneje sestavite lekcije.
An annotation is a mark on the recording's timeline: "something worth showing happened here". Lessons are later built out of annotations.
-
Predvajajte posnetek do mesta, ki ga želite označiti
Play the recording up to the spot you want to mark
Nova anotacija vedno nastane na trenutnem mestu predvajanja. Zato se najprej ustavite tam, kjer želite oznako.
A new annotation is always created at the current playback position. So stop where you want the mark first.
-
Kliknite NEW
Click NEW
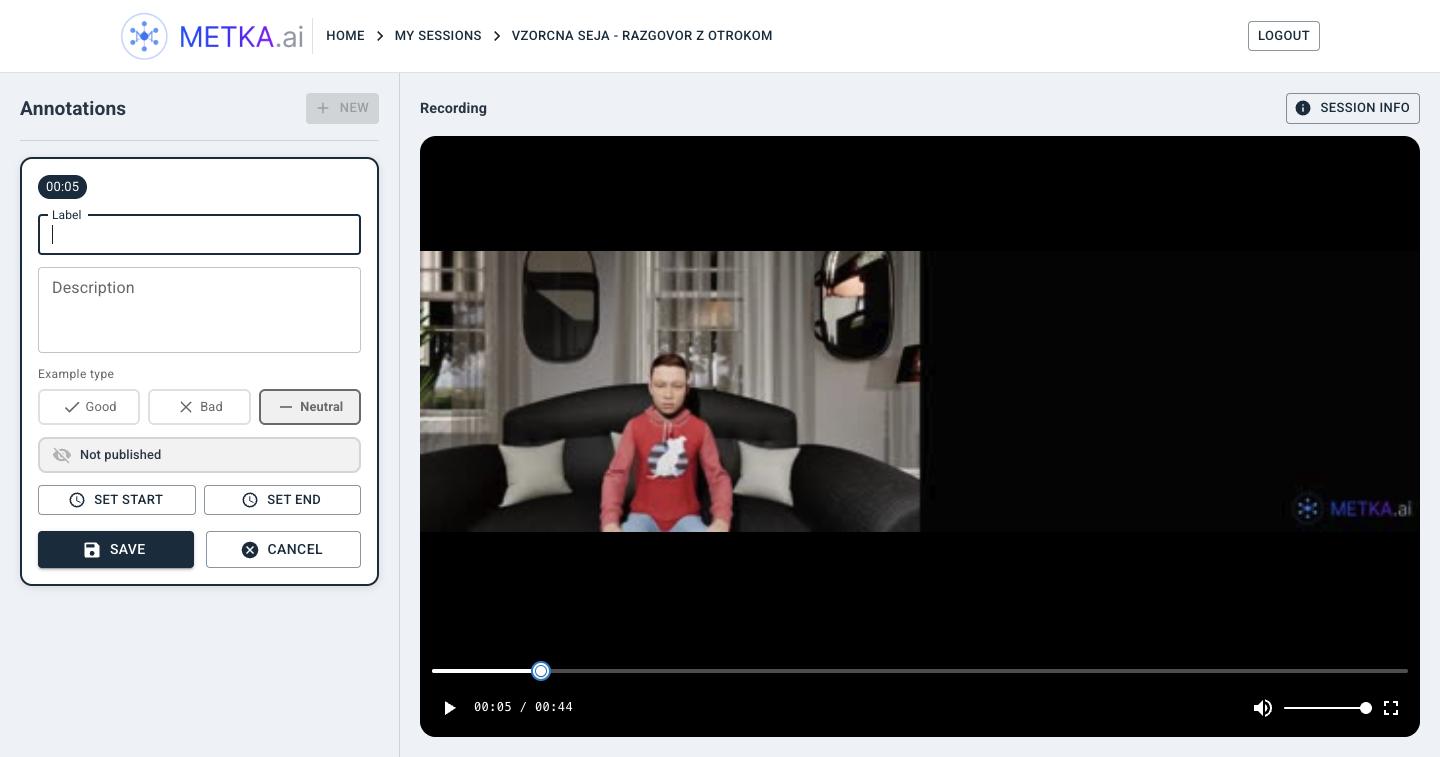
Začetni čas (00:05) se prevzame s časovnice. The start time (00:05) is taken from the timeline. -
Izpolnite anotacijo
Fill in the annotation
- Label — kratek naslov, npr. „Sugestivno vprašanje“.
- Label — a short title, e.g. "Leading question".
- Description — razlaga, zakaj je to pomembno.
- Description — an explanation of why it matters.
- Example type — Good dober primer, Bad pogosta napaka, Neutral samo opomba.
- Example type — Good good practice, Bad common mistake, Neutral just a note.
-
Nastavite začetek in konec
Set the start and the end
Predvajajte naprej do konca odseka in kliknite SET END. Če se zmotite, premaknite predvajanje in kliknite SET START ali SET END znova.
Play on to the end of the passage and click SET END. If you get it wrong, move the playhead and click SET START or SET END again.
Konec ni obvezen. Brez njega je anotacija samo točka v času.
The end is optional. Without it the annotation is just a point in time.
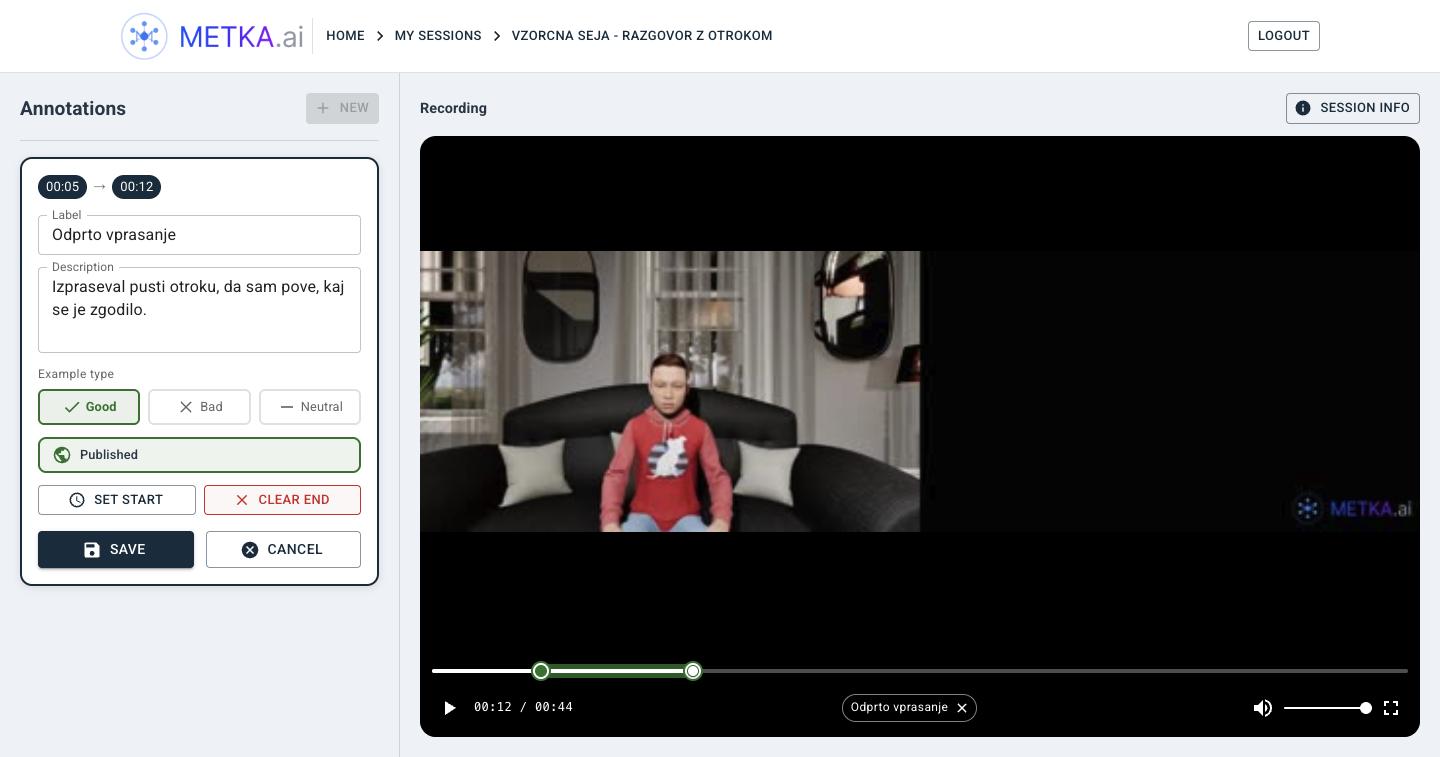
Izpolnjena anotacija od 00:05 do 00:12, označena kot dober primer in objavljena. A finished annotation from 00:05 to 00:12, marked as good practice and published. -
Odločite se za Published ali Not published
Decide between Published and Not published
To je edino, kar preklop naredi: Published pomeni, da lahko anotacijo uporabite kot primer v lekciji. Not published pomeni, da je ne morete.
Ne gre za zasebnost. Vse anotacije posnetka vidijo vsi v vaši organizaciji — tudi neobjavljene. Neobjavljene uporabite za zapiske zase.
That is all the toggle does: Published means the annotation can be used as an example in a lesson. Not published means it cannot.
It is not about privacy. Everyone in your organization sees all annotations on a recording — including unpublished ones. Use unpublished ones for notes to yourself.
Na koncu kliknite SAVE.
Finally click SAVE.
-
Ponovite za vse pomembne trenutke
Repeat for every important moment
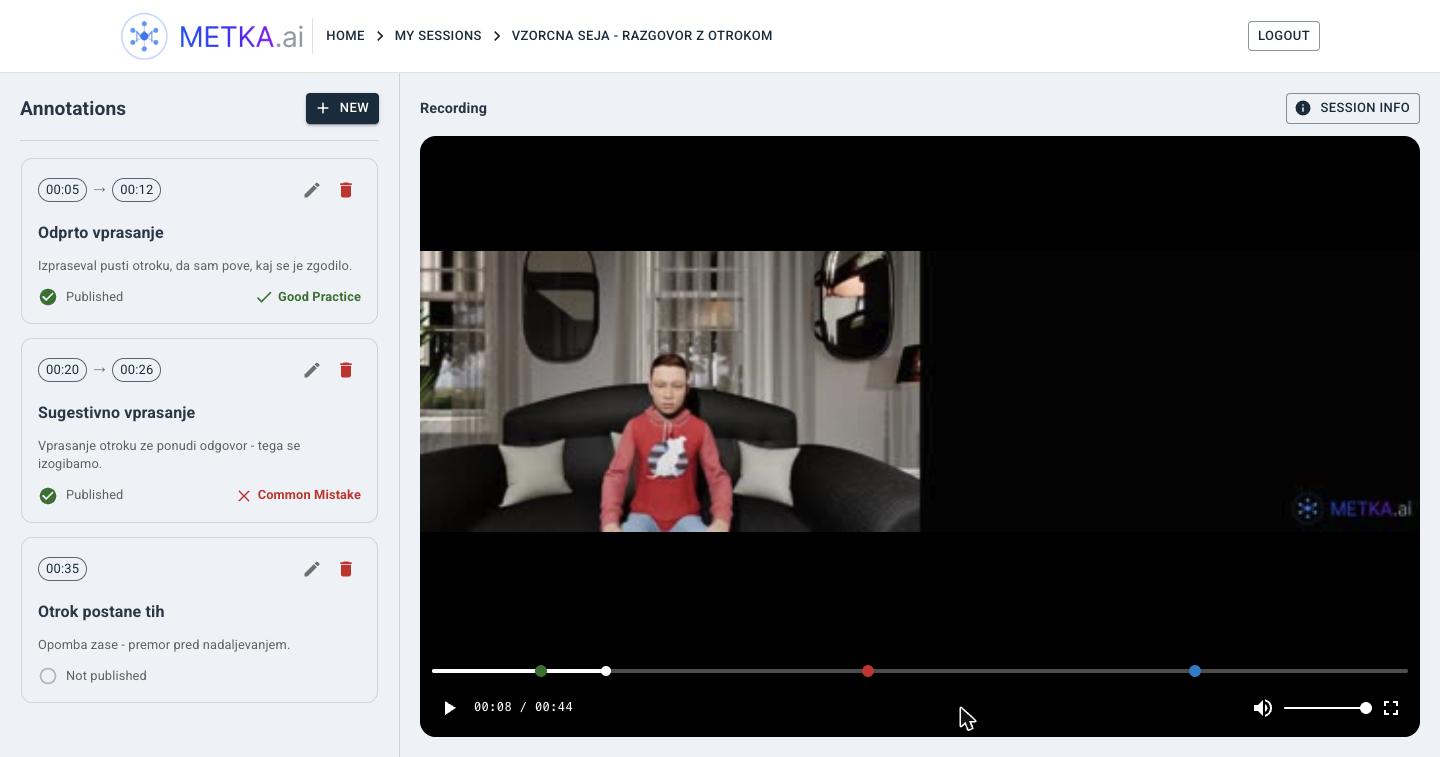
Tri anotacije. Vsaka ima piko na časovnici: zelena = dober primer, rdeča = napaka, modra = nevtralna. Three annotations. Each has a dot on the timeline: green = good practice, red = mistake, blue = neutral. S svinčnikom anotacijo uredite, s košem jo izbrišete.
The pencil edits an annotation, the bin deletes it.
Anotacije lahko dodaja, ureja in briše vsak v vaši organizaciji, ne samo lastnik posnetka.
Annotations can be added, edited and deleted by anyone in your organization, not just the owner of the recording.
5PredvajalnikThe player
Posnetek seje je sestavljen: levo avatar, desno kamera študenta.
The session recording is a composite: the avatar on the left, the student's camera on the right.
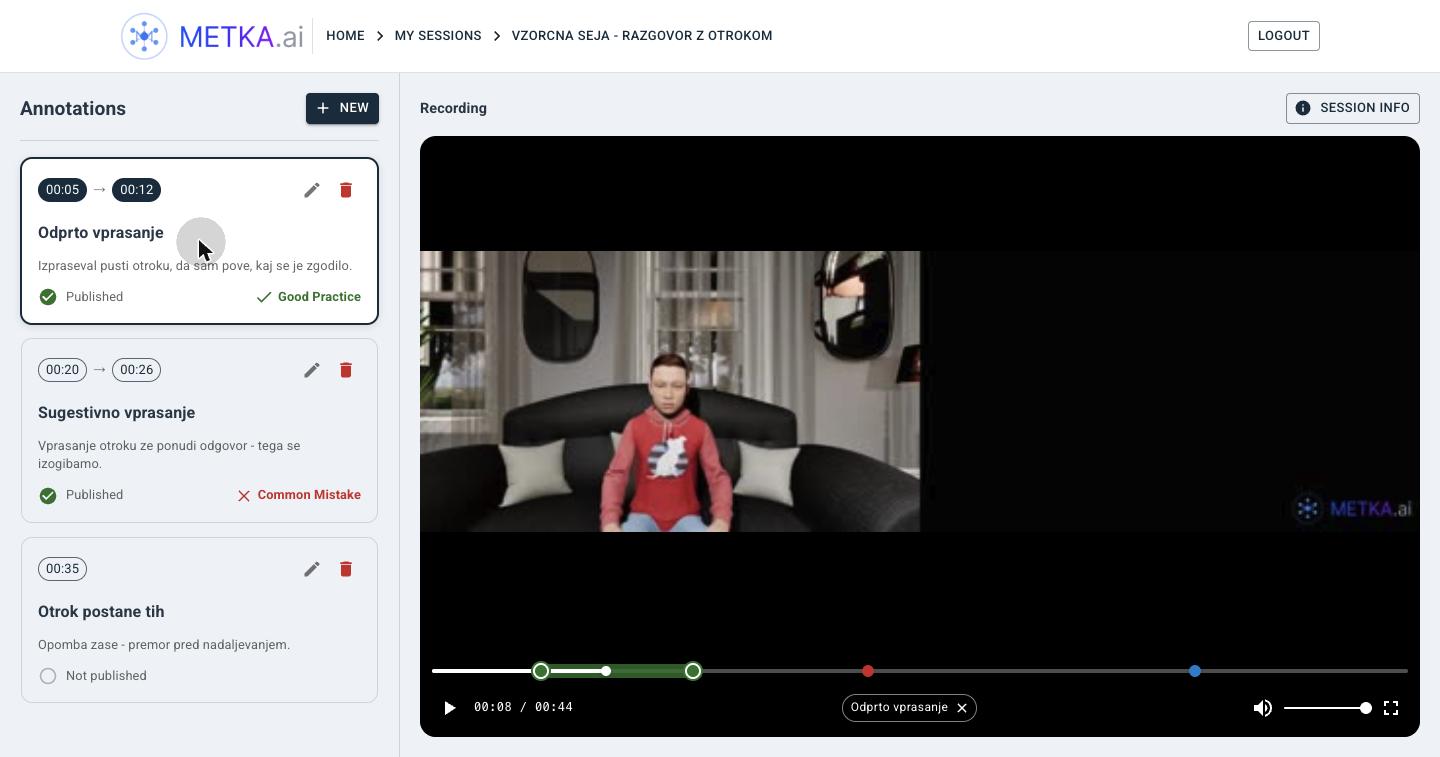
Kaj kje deluje
What does what
- Klik na video — predvajanje / pavza.
- Click the video — play / pause.
- Klik ali poteg po časovnici — premik na drugo mesto.
- Click or drag the timeline — jump to another spot.
- Klik na barvno piko — skok na to anotacijo in začetek predvajanja.
- Click a coloured dot — jump to that annotation and start playing.
- Miška nad piko — pokaže naslov in čas anotacije.
- Hover a dot — shows the annotation's title and time.
- Klik na anotacijo v seznamu levo — isto kot klik na piko.
- Click an annotation in the list on the left — same as clicking its dot.
Ko je anotacija izbrana, se predvajanje ustavi na njenem koncu. To ni napaka — predvajalnik namenoma ostane znotraj izbranega odseka. Za predvajanje celotnega posnetka anotacijo odznačite s križcem ✕ ob njenem naslovu pod videom.
While an annotation is selected, playback stops at its end. That is not a bug — the player deliberately stays inside the selected range. To play the whole recording, deselect it with the ✕ next to its title below the video.
Med urejanjem anotacije lahko njen začetek in konec povlečete neposredno po časovnici.
While editing an annotation you can drag its start and end handles directly on the timeline.
6LekcijeLessons
Lekcija je učno gradivo iz besedila in videoposnetkov. Videoposnetki niso nove datoteke — so vaše objavljene anotacije, ki predvajajo točno tisti odsek izvirne seje.
A lesson is teaching material made of text and video clips. The clips are not new files — they are your published annotations, playing exactly that passage of the original session.
Lekcije lahko ustvarja in ureja samo, kdor ima pravico lesson_editor. Če gumba CREATE LESSON ne vidite, je nimate — pišite na vid.klopcic@fri.uni-lj.si.
Only users with the lesson_editor permission can create and edit lessons. If you cannot see the CREATE LESSON button, you do not have it — write to vid.klopcic@fri.uni-lj.si.
-
Odprite Lessons in kliknite CREATE LESSON
Open Lessons and click CREATE LESSON
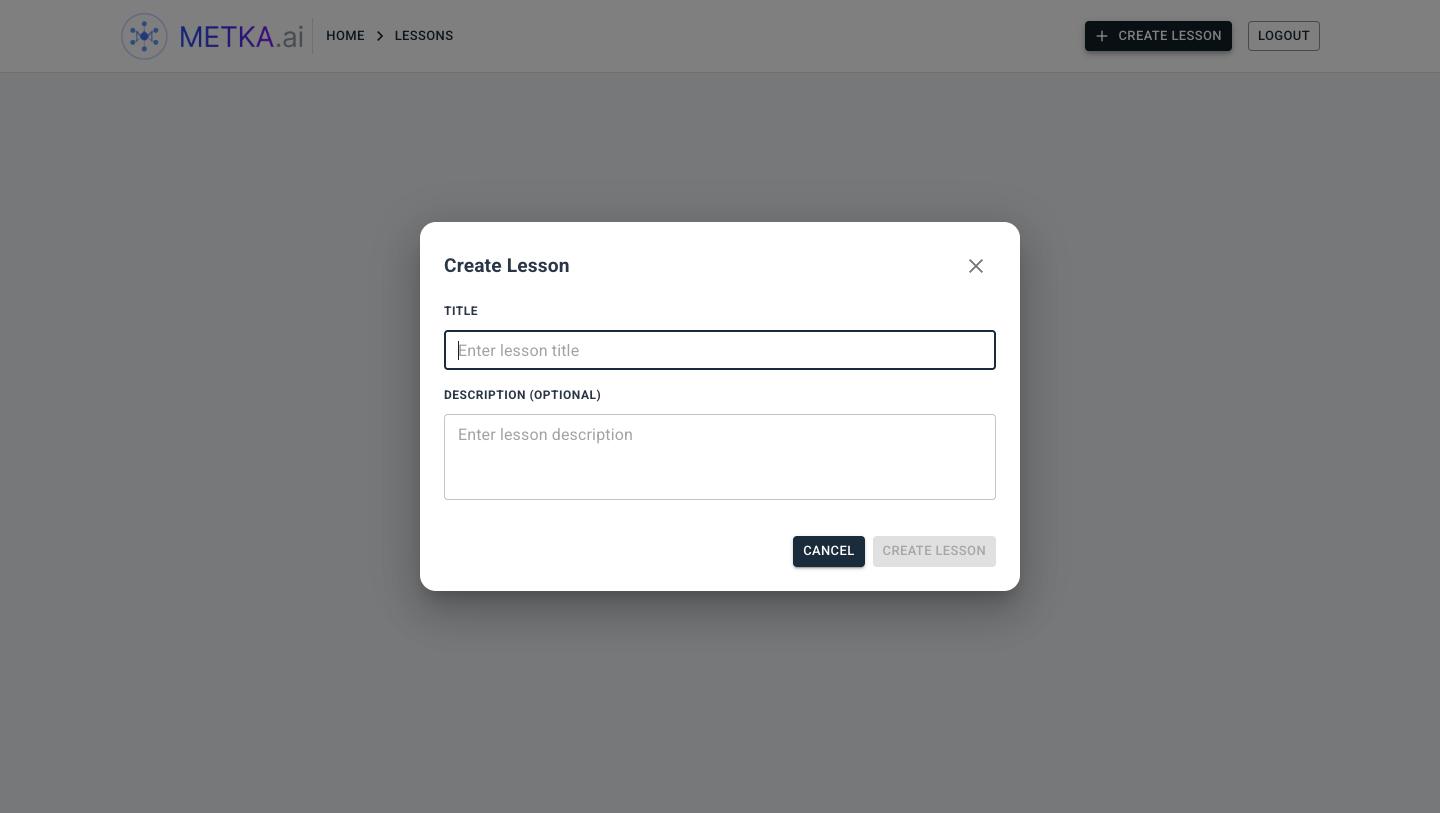
Vpišite naslov (obvezno) in opis (neobvezno), nato CREATE LESSON. Odpre se urejevalnik.
Enter a title (required) and a description (optional), then CREATE LESSON. The editor opens.
-
Dodajte sliko in poglavje
Add a cover image and a chapter
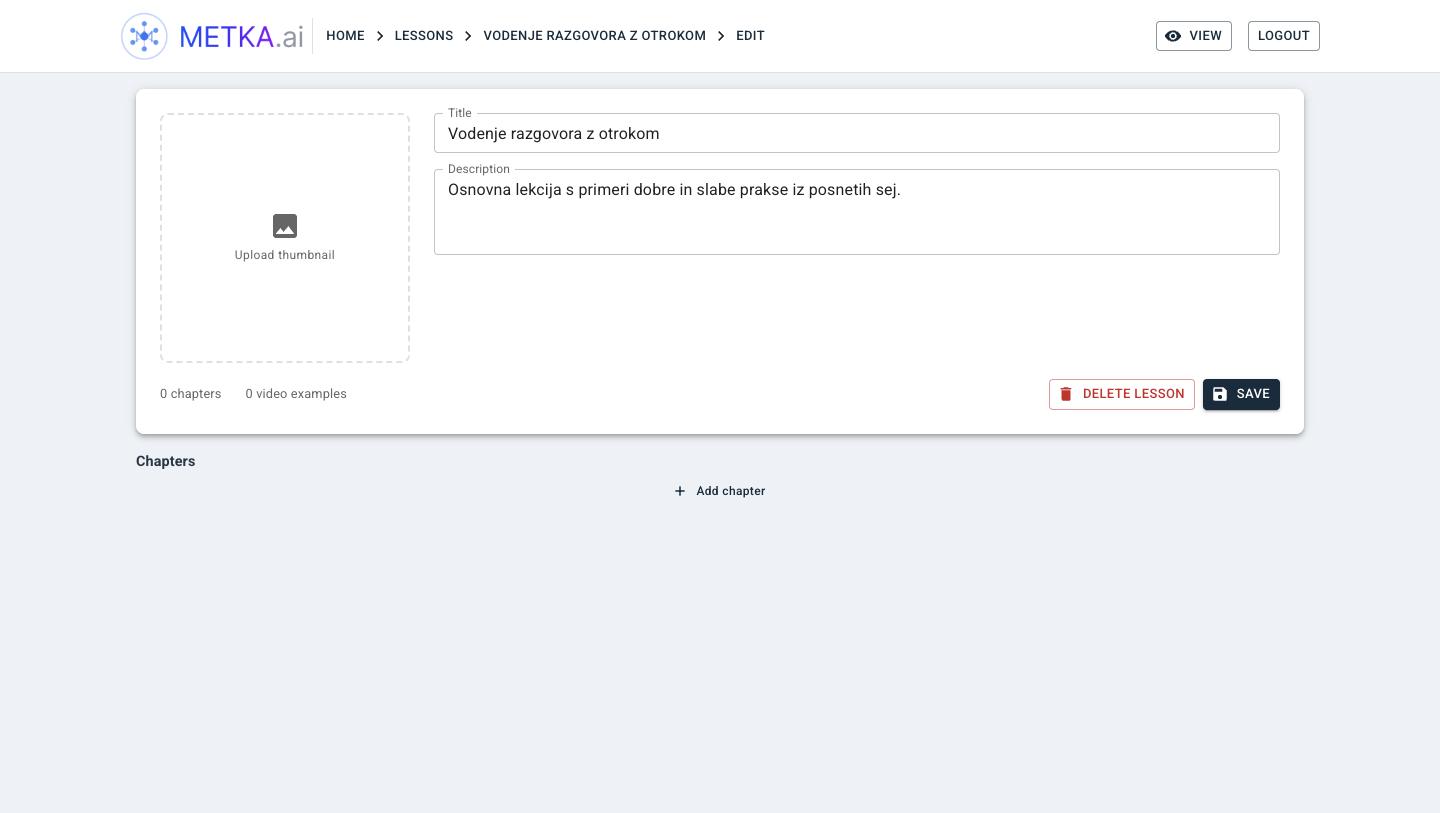
Levo zgoraj povlecite sliko za naslovnico. Nato kliknite Add chapter. S svinčnikom ob naslovu poglavje preimenujte.
Drag a cover image into the box at the top left. Then click Add chapter. Rename the chapter with the pencil next to its title.
-
Dodajte besedilo
Add text
Kliknite Add text. Zgoraj izberite Block Style — Normal, Good (zeleno), Bad (rdeče) ali Note (modro). Slog samo obarva okvir bloka.
Click Add text. Pick a Block Style at the top — Normal, Good (green), Bad (red) or Note (blue). The style only colours the block.
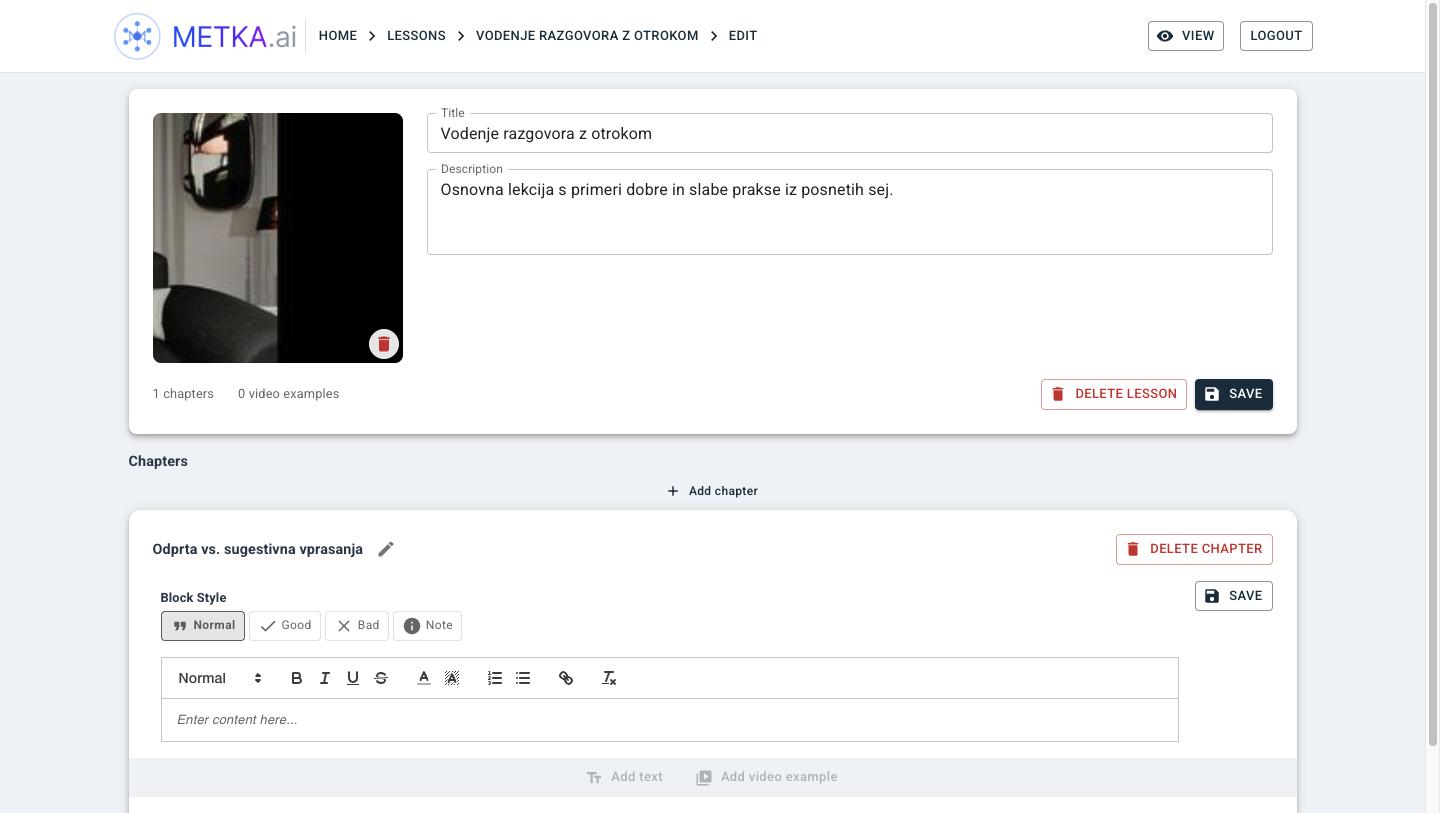
Ko končate, kliknite SAVE ob bloku. When done, click the SAVE next to the block. -
Dodajte videoprimer
Add a video example
Kliknite Add video example. Odpre se seznam anotacij.
Click Add video example. A list of annotations opens.
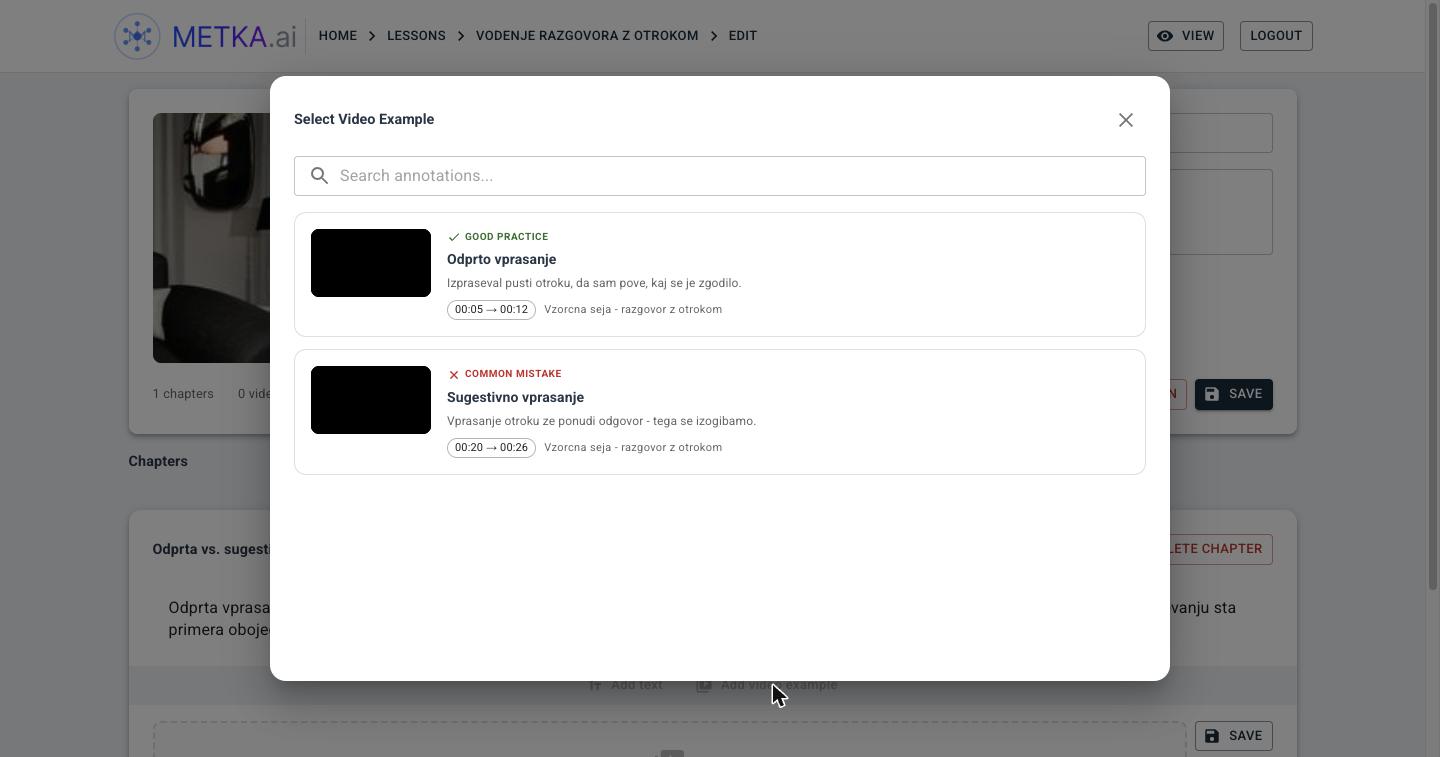
Na seznamu so samo objavljene (Published) anotacije iz sej vaše organizacije. Če anotacije ne najdete, ni objavljena — vrnite se na sejo in jo objavite. The list contains only published annotations from your organization's sessions. If you cannot find one, it is not published — go back to the session and publish it. Iskalno polje išče po naslovu in opisu anotacije.
The search box searches annotation titles and descriptions.
-
Sestavite poglavje
Build up the chapter
Vrstici Add text / Add video example se pojavita med vsemi bloki — nov blok vstavite točno tja, kamor sodi.
The Add text / Add video example row appears between every block — insert a new block exactly where it belongs.
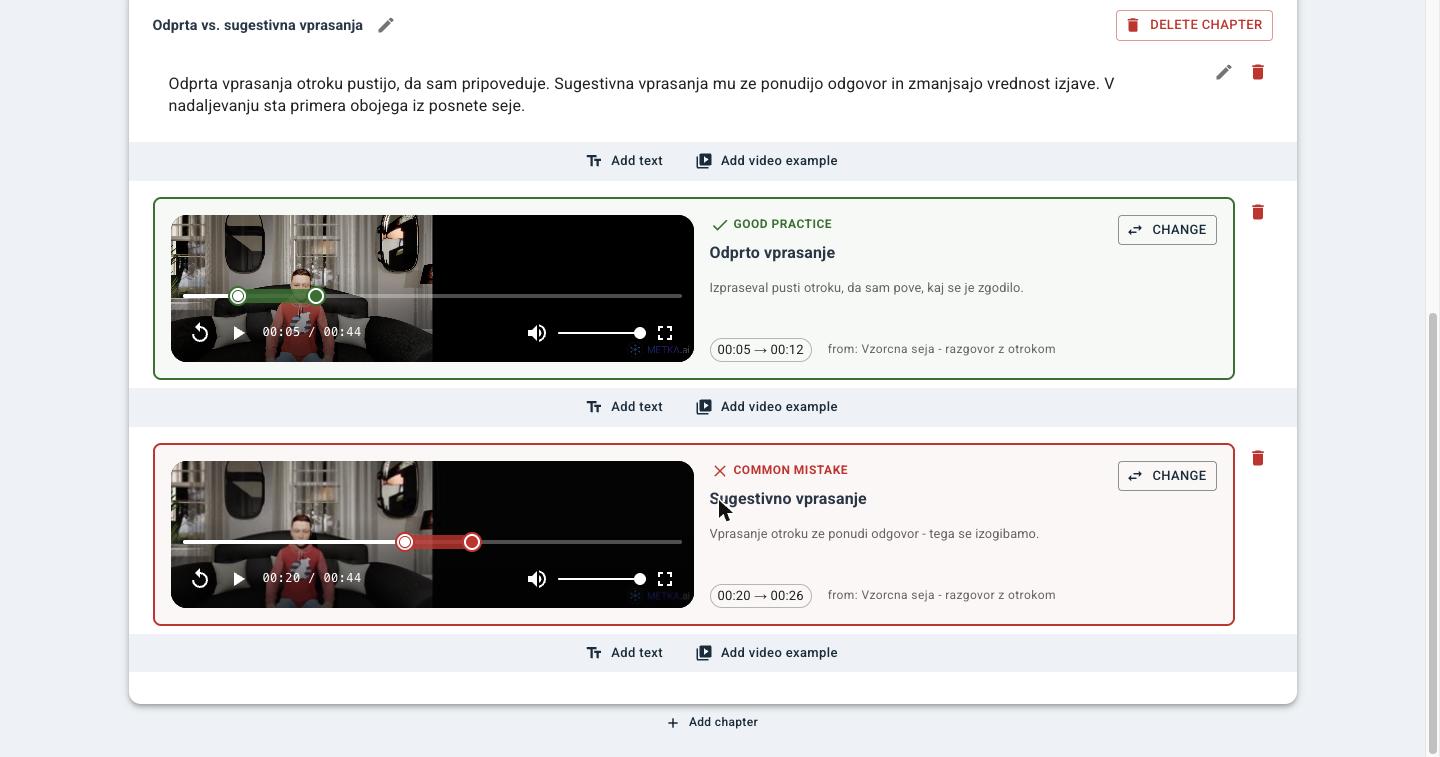
Poglavje z uvodnim besedilom in dvema primeroma — dobrim in slabim. A chapter with an intro text and two examples — a good one and a bad one. Na koncu kliknite SAVE zgoraj (poleg DELETE LESSON), da shranite naslov, opis in sliko.
Finally click the SAVE at the top (next to DELETE LESSON) to save the title, description and cover image.
-
Poglejte, kako lekcija izgleda
See how the lesson looks
Kliknite VIEW zgoraj desno.
Click VIEW at the top right.
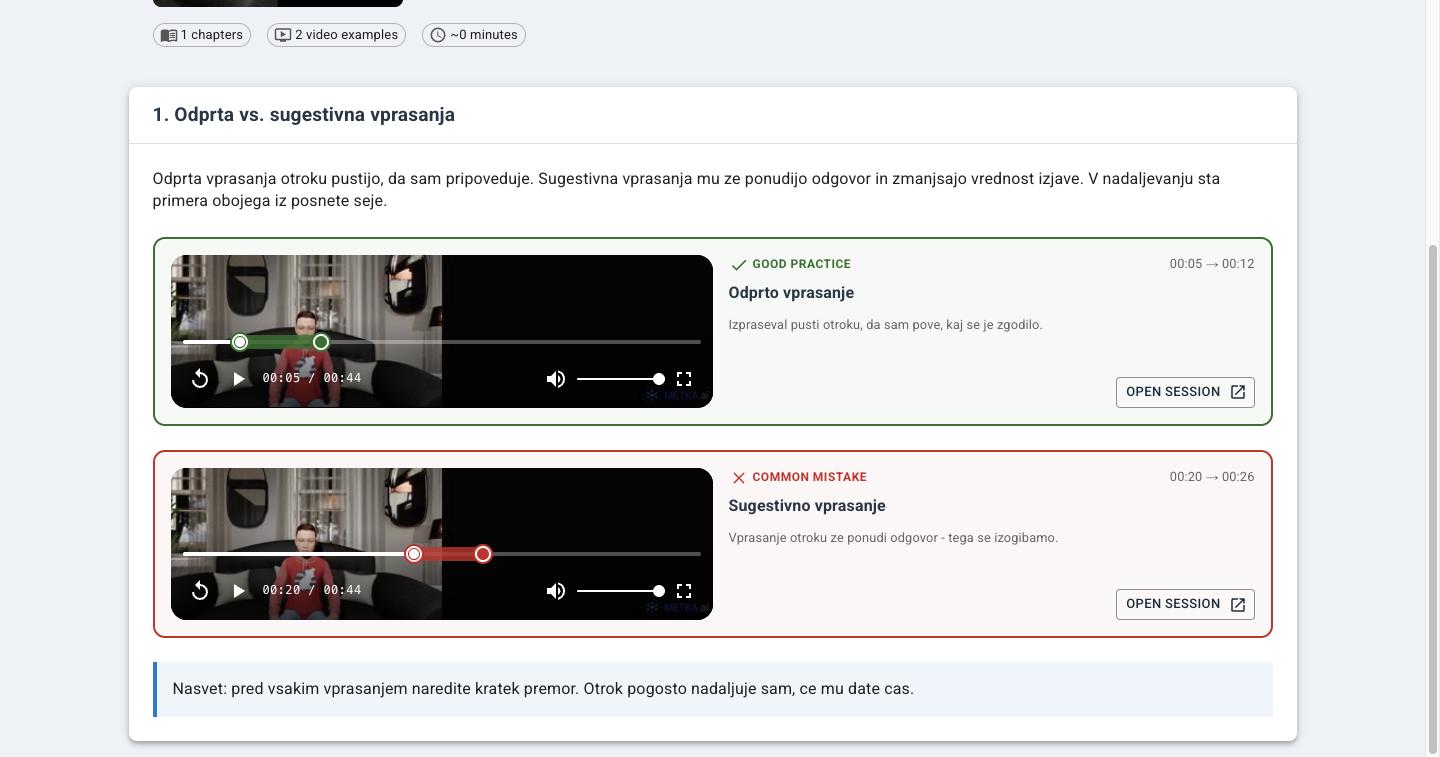
Vsak primer predvaja samo svoj odsek. OPEN SESSION odpre celotno izvirno sejo v novem zavihku. Each example plays only its own passage. OPEN SESSION opens the full original session in a new tab. Za nadaljnje urejanje kliknite EDIT.
To keep editing, click EDIT.
Lekcije ni treba posebej objaviti. Takoj ko jo ustvarite, jo vidijo vsi v vaši organizaciji.
A lesson does not need to be published. As soon as you create it, everyone in your organization can see it.
7Kdo kaj vidiWho sees what
Vsak uporabnik pripada eni organizaciji. Vse deljenje poteka znotraj nje — posebnih nastavitev za deljenje ni.
Every user belongs to one organization. All sharing happens inside it — there are no separate sharing settings.
| Kaj | What | Kdo vidi | Who sees it | Kdo lahko spreminja | Who can change it |
|---|---|---|---|---|---|
| Seja, ki jo naložite | A session you upload | Vsi v vaši organizaciji, takoj | Everyone in your organization, immediately | Podatke ureja vsak v organizaciji; izbriše jo lahko samo lastnik | Anyone in the organization can edit the details; only the owner can delete it |
| Anotacije | Annotations | Vsi v organizaciji — tudi neobjavljene | Everyone in the organization — including unpublished ones | Vsak v organizaciji | Anyone in the organization |
| Lekcije | Lessons | Vsi v organizaciji | Everyone in the organization | Samo uporabniki s pravico lesson_editor | Only users with the lesson_editor permission |
Ni zasebnih sej. Karkoli naložite, je takoj vidno celotni vaši organizaciji. Ni gumba za „zasebno“ ali „nedeljeno“. Če posnetka ne želite deliti, ga ne nalagajte.
There are no private sessions. Anything you upload is immediately visible to your whole organization. There is no "private" or "unshared" switch. If you do not want to share a recording, do not upload it.
My sessions so seje, ki ste jih naložili vi. Organization sessions so vse seje vaše organizacije — vključno z vašimi. Zato se iste seje pojavijo na obeh seznamih.
My sessions are the sessions you uploaded. Organization sessions are all your organization's sessions — including your own. That is why the same sessions appear in both lists.
8Ko gre kaj narobeWhen something goes wrong
| Težava | Problem | Kaj narediti | What to do |
|---|---|---|---|
| Avatar zveni popačeno, robotsko ali nerazločno | The avatar sounds garbled, robotic or slurred | Napačen Pitch. Govorite in premikajte drsnik po en korak, dokler ne zveni pravilno. | Wrong Pitch. Keep talking and move the slider one step at a time until it sounds right. |
| Slika zamrzne ali se popikasti | The picture freezes or goes blocky | Osvežite stran (F5) in znova vstopite z istim geslom seje. Če se ponavlja, poskusite s kablom namesto WiFi. | Reload the page (F5) and rejoin with the same session password. If it keeps happening, try a cable instead of WiFi. |
| Odmev ali piskanje | Echo or howling | Nekdo nima slušalk ali sta dva udeleženca v istem prostoru. Vsi naj nadenejo slušalke. | Someone has no headphones, or two participants are in the same room. Everyone should put headphones on. |
| Drugi me ne slišijo | Others cannot hear me | Preverite, da mikrofon ni utišan (ikona mikrofona), in da je pod zobnikom izbrana prava naprava. | Check the microphone is not muted (the mic icon), and that the right device is picked under the gear. |
| Po seji ni posnetka | No recording after the session | Snemanje najbrž ni bilo vklopljeno. Naslednjič po START SESSION kliknite še okrogli gumb za snemanje. | Recording was probably never started. Next time, click the round record button after START SESSION. |
| Posnetek se še vedno obdeluje | The recording is still processing | Zaprite brskalnik in se pozneje vrnite z istim geslom seje. | Close the browser and come back later with the same session password. |
| Anotacije ne najdem med videoprimeri | I cannot find my annotation among the video examples | Ni objavljena. Odprite jo na strani seje in preklopite na Published. | It is not published. Open it on the session page and switch it to Published. |
| Ne vidim gumba CREATE LESSON | I cannot see the CREATE LESSON button | Nimate pravice lesson_editor. Pišite na vid.klopcic@fri.uni-lj.si. | You do not have the lesson_editor permission. Write to vid.klopcic@fri.uni-lj.si. |
Za vse ostalo pišite na vid.klopcic@fri.uni-lj.si. Napišite, kdaj se je zgodilo in katero geslo seje ste uporabljali — tako je težavo mogoče najti v dnevnikih.
For anything else write to vid.klopcic@fri.uni-lj.si. Say when it happened and which session password you used — that makes it possible to find the problem in the logs.